October, home tour and projects

Friday, October 31, 2014 0 comments

Hello and happy Halloween! I hope your forecast is better than ours! We’ll be heading out after school to get the kiddo some new long underwear for this evening. It may be a quick trip around the neighborhood tonight! :)

Thank you SO much for the love on our family room, not only here but on Instagram and Facebook as well. I truly, truly appreciate when you take the time to comment – it doesn’t go unnoticed!

At the end of of each month I like to recap some of my favorite posts – it’s a nice way to see what I’ve accomplished and catch you up if you missed a post. I’m definitely planning to slow my roll a bit for the rest of the year -- November and December are going to be unusually busy for us. So I’m looking forward slowing down the projects…cleaning and decluttering my house and decorating for the holidays sounds amazing! I can’t not do DIY, I love it, so I’ll still be working on things here and there of course.

Before I go into the recap I wanted to share that I’ve updated the “Our Home” page – some of the photos were a bit dated and I rearranged some things too. I’ve also added a Projects tab at the top of the site that includes some of my favorite decor, projects, tips and recipes over the years. I try to update that at least every couple of weeks so there’s always new sections and links popping up.

OK – to start the month I addressed the naked windows in the dining room/library. They had shades but no drapes so I took care of that:

wall of built ins

The drapes were from our living room windows and they look SO much better in here. I still can’t believe how much warmer it feels in there – it’s a little thing but it made a big difference. I have some more updates of that room to share soon!

Next up I shared the ways I decorate our walls/fill them without using art:

wood planked wall stained

That planked wall cost me less than $50 and it’s one of my favorite projects ever! I’m all about easy ways to add character to our home and this does it.

I’m so excited about the potential for our kitchen and thrilled with the table and it’s new spot. I had fun decorating it for a fall table setting:

simple fall table setting

Can’t wait to show you that same space with the new doors and board and batten on the walls! I think it’s going to look so good!

I did a little fall nesting throughout the rest of the house as well and warmed up the bedroom fireplace a bit:

green walls fireplace

That fireplace is one of the many things I fought my husband on hard when we built this house – and it’s now one of the many things that I now thank him for. ;)

The Bub and I took a trip to Cincinnati for a fun day and my part of the fun was IKEA. I shared a few of my favorites from the trip (including some Christmas decor):

ikea kitchen

This is my favorite kitchen at that IKEA. I walk through it every single time. :)

I finished up the new trim and paint on four doors in and near the family room and I LOVE it, as always:

thick door trim

Many of you asked about the signs on our bathroom door (I love them!!) and I link to where I got those in the comments of that post:

thick craftsman door trimBlack and white will always be a classic!

It has been an absolutely glorious fall this year – I shared our day trip to beautiful Brown County Indiana:

fall in Indiana

There’s still a few leaves hanging on – but the potential snow predicted this evening (!!) make take most of them.

One of my dream projects for our house has always been a window seat – and I’m finally going to get one. :) :) So excited. I shared my inspiration for what I’d like to do in this post:

bay window window seat

(source)

If you follow along on Instagram or FB I’ve shared/will be sharing some more pics along the way. I’m really tired of painting but I may tackle the new window trim in that spot this weekend.

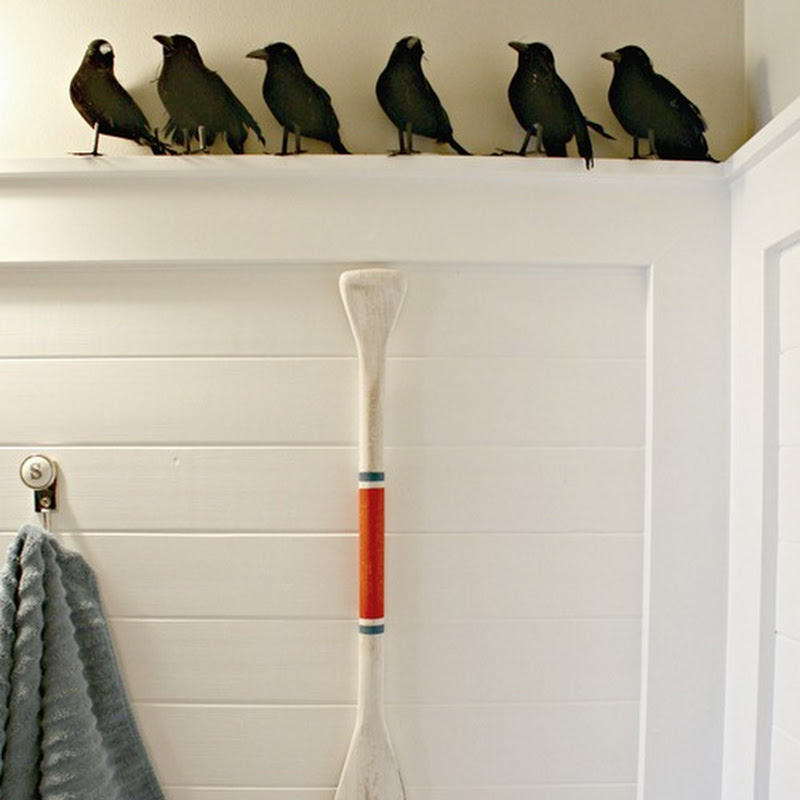
We only put Halloween decor out for a week or so inside the house and I shared how we do it quick and cheap here:

cheap Halloween decor

You’ll have to go to that post to see the surprise under the crows. ;)

One of the last projects I finished up in the family room was an old Craigslist dresser I painted:

black dresser brass hardware

I absolutely LOVE it in this deep gray color. By the way, I’ve been saying that paint color (Graphite) is Sherwin Williams and it’s not – duh! It’s Benjamin Moore but I had it mixed at SW. Sorry about that. :)

And of course, the full family room reveal happened earlier this week – finally. Goodness, we are SO happy with it!:

family room with board and battenI’ll be sharing more details about the space next week!

Have a safe Halloween and a lovely weekend!! See you Monday!

Family room reveal!

Wednesday, October 29, 2014 0 comments

OK. I’m done. I can’t even believe it!! The family room expansion/renovation is DONE. GoodNESS, I worked my butt off on this room! I will go into a bigger background recap later, but long story short is that we wanted to add on to the back of our house, decided against it when we got the quotes (choke) and then decided to knock down a wall instead.

That wall was the one between the family room and my office, the one with the corner fireplace and the wall to the left: corner fireplace

Our original expansion plans were just to move out from that window wall and make the back part of the house more of a sunroom to extend the family room. We were never going to touch that office wall because I really wanted to keep my office. Turns out I don’t even miss, not at all. Isn’t that funny? It was a BEAUTIFUL room but no one ever saw it anyway! Except you guys, ha!

When my mind started working and the thought that taking down this wall might work, I sent this “real life” shot from my phone to two realtor friends to see what they thought. This really shows you a better angle:

The area to the left is our walk way from the mud room and garage and is where we had the TV. We reconfigured the space like this years back and it did help – but I didn’t like the corner fireplace and didn’t like that the room had different focal points.

It’s funny because I look at that photo and we had a much wider space when it was like that. But now, it’s SO MUCH BETTER because the family room is bigger and the kitchen doubled in size as well.

The space is long and skinny – we didn’t get any additional width to the room at all. In fact it’s skinnier now because everything is situated towards the back of the house. But we absolutely positively love it:

dark gray fireplace

From the day we took down the wall we both said – it was supposed to be like this from the start. Actually every single change we’ve made in this whole great room (moving the kitchen table, switching out the doors, all of it) we’ve said the same every time. It should have been like this all along.

Taking down that wall brought in an insane amount of natural light – we gained two windows from the office. We also added six new overhead lights to the space:

family room renovation @thriftydecorchick

The focal point of the room is now the grand fireplace and built ins:

gray fireplace herringbone tile @thriftydecorchick

We had to built it into the room to accommodate the size of the gas insert – we dealt with that by building out the entire thing and adding storage for electronics and all kinds of other stuff.

I went dramatic and gray with the whole thing and I adore it:

fireplace with built ins I am debating moving the rug down so it’s centered on the fireplace. I like how the sectional sits on it now though – if I move it the sectional will sit half on and half off.

To get an idea of how this renovation opened up the space – the old wall went right down the middle of the new fireplace. Because of the angle of the old fireplace we had about two feet, then windows. There was nowhere else to put furniture but right in front of that double window.

I can’t believe that our family room used to go that far into the kitchen! It actually went almost to the right side of that étagère:

Crazy! The final frontier in this renovation is the double doors that will take the place of that window – it was supposed to happen last week but we had a hiccup. :) More on that soon! (And those drapes will be replaced with some that match the other side of the room soon. These are up for privacy now.)

There are little things we noticed right away when we started this process. First, the animals LOVE IT. They are in this space way more than before. It’s weird. Secondly, we love that there’s one focal point in the space. I used to hate TVs over fireplaces but I’m actually falling in love with the look (and I really disliked it!). There’s no competition for your attention, it’s clean and makes the space feel even bigger. Finally, our view in here is SO much better.

I love love LOVE to sit down on this sofa during the day:

new family room @thriftydecorchick

Everything is oriented to the outside. Before our view from the sofa was the front door and the TV. Now’s all the light and the trees and our pretty deck and patio. I absolutely LOVE that. It’s completely changed how this room feels.

We have more seating in the room now too – the chair to the right is my new “office.” It’s a super cozy spot! The newly painted dresser and the built in to the left of the TV hold my office supplies:

analytical gray sherwin williams

We get so much light in here now it’s hard to get good shots! I’ll take that problem any day. The natural light is why I knew the space could take the darker pieces. I love how they add some drama.

I have a lot of favorite spots in this space and this is one of them. That spool chair was the only furniture purchase for this room and I ADORE it:

board and batten walls

I looked for months for the perfect chair and found it a few weeks ago at HomeGoods. It is spectacular. :)

spool chair

See? Spectacular. And incredibly comfy too!

I moved what used to be used as a sofa table to the wall where the TV was before:

world market everett table

Since the sectional is floating in the middle of the room the dresser I had on this wall felt too deep. This table is perfect since it’s nice and skinny.

The big mirror was a happy accident – I leaned it up there to see how it felt and it makes the room feel even brighter – when I’ve taken it down to paint behind it there’s a noticeable difference in the room:

decorating a sofa table

I thought this walkway would feel tight but it’s actually perfect:

walkway behind sofa

Before the walkway was right in front of the TV and again – this just feels “right.” I told you we keep saying that! It’s how it always should have been. :)

And finally, this is my view as I sit and write:

That view will look even better when the kitchen renovation starts…next year…a long time from now…cause Mama needs a break. :)

I still want to share more details and photos of the space, some before and afters and all of the sources as well – I will share those very, very soon!

For now I think I’ll join him:

butter dog

If you have any questions about anything let me know and I’ll be sure to address it!

THANK YOU for coming along for the ride! I don’t think I’ve ever worked harder on a space but not sure I’ve ever been prouder of a space either. :)

Black and brass

Monday, October 27, 2014 0 comments

Welcome to a new week my friends! Hope you had a lovely weekend!

Yesterday I finished up the last DIY project for the family room – I think I keep saying everything is the “last” project and then I realize I have another one. For for real – this is it. We’ve been able to rework most of what was in the room before in the new set up and I’m pretty excited about that. I’ve only made one purchase for the “new” space – a gorgeous chair I found a HomeGoods a few weeks back. I’m in lurrrve with it.

In our old set up we used a dresser as the entertainment center:

IMG_7186

I use dressers all over our house for storage – they’re pretty and functional. Most of them are Craigslist finds – well, pretty much all of them actually. The one above is one of my favorites but it was too long for the new spot in the family room set up.

So I switched that out for one that’s been in our bedroom for years. I’ve always had a plan to paint it but I bought it because I LOVED the lines:

paiting a dresser

Most of my dressers I would never paint – even with some damage I love the warm feel of the wood. This one though, I’ve never loved. The finish was a “fake” look – it’s an odd look that I didn’t care for. It had almost a spattered finish on the wood, I’m not sure how else to describe it. Let’s just say it wasn’t a pretty wood finish. And I’ve always really disliked the hardware on it as well – it’s felt too frilly for me.

So I didn’t feel bad painting this one. I considered just sanding it down to a more natural state – I’m loving that trend lately. But the new chair that sits in front of it already has a lighter look and I knew it wouldn’t be enough contrast.

AND sanding it down would require a ton of work – taking it outside and trying to get into all the little detailed areas of the piece. I prefer sitting on my butt and painting inside. ;)

I started by wiping it down well – I’ve used tsp cleaner in the past but over the past few years I’ve realized just regular cleaning wipes work just as well. You just want to get any residue or dust off of whatever you’re painting.

I primed it with my favorite primer:

bin primer painting furniture

I have this tinted gray because I use it on all of our interior black doors. It’s a super thin primer and SO easy to apply. It always goes on incredibly well and dries really fast.

Because I wanted to replace the hardware I filled the holes on the top drawers (they were a different type of hardware than the rest of the drawers):

how to paint furniture

After the coat of primer I made sure to give the flat surfaces a really quick sanding:

sanding furniture

I kind of loathe sanding but this is just a light, fast sanding to knock it down just a bit. You’ll want to do that between each coat of color too – if you don’t (I skipped it once or twice this time) your surfaces won’t be super smooth. Not a big deal but it feels better with a smoother finish.

I knew I was going to like it when it was all primed and ready for paint: how to paint furniture

I swear sometimes painting a piece really helps the pretty details and lines shine.

I found this AWESOME brush at Lowe’s that I used for most of the painting:

square paint brush

It’s a square brush and I’ve never seen one like it. It’s made for painting window panels but it was perfect for getting into all the grooves in the dresser. Loved it!

I’ve said many times over the years that I believe every room should have a touch of black. It’s grounding and gives some great contrast. I used to paint ever.y.thing. black but I’ve stopped that. ;) But I knew this one would look striking in a darker color so I went for it. I used the Graphite color by Sherwin Williams that I’ve used for our interior doors.

I found hardware that matched the wide (five inch) span of the old hardware but it was a brushed nickel and kind of basic. I didn’t love it. So I held up the old hardware against the new dark color and feel head over heels with it:

vintage brass hardware

Well huh! I’m not kidding when I say I really didn’t care for these handles before – and now I absolutely positively LOVE them. I gave them a good cleaning with my brass cleaner and they are looking so much better than before. (Yes I had to knock out that filler I had put in the top drawers.)

You can see all the pretty lines of the dresser here:

black dresser

I am obsessed with it now. Obsessed:

black dresser brass hardware

It’s so beautiful, I couldn’t be happier with how it turned out! 

On our doors that Graphite color looks more black but you can see it’s true color better here – a dark, dark gray:

painted black dresser

I haven’t dressed it up yet – I just threw stuff on it for the pictures.

This dresser serves as my “office” storage. Or at least it will soon – I have some items in it but need to switch out my supplies from the dresser that used to sit in my office.

dresser for office storage

The best part – I spent $7 on a new brush and that’s all this redo cost me. WHOOT! I had the primer and paint so that’s always a bonus. I haven’t distressed it at all yet – I’ve said before that distressing stresses me. :) After all that work I hate to mess it up on purpose. So I’ll probably just let that happen on it’s own. And soon I’ll put a couple coats of satin poly on the top to protect it against scuff marks.

I am still laughing about that hardware too – I can’t believe how much I love it against the darker color. I think this may be my favorite painted piece ever and it’s the handles that put it over the top for me. Have you painted furniture? Do you have a go-to color?

I’ll be back on Wednesday with the whole space! I’m going to work hard over the next two days to get all the smaller details finished up.

$10 and under Halloween

Friday, October 24, 2014 0 comments

Happy Friday to you! Only a week till the end of the month and Halloween, can you believe it? I can’t. We’ve had our Halloween decor up outside for a while but because I’ve been focused so much on DIY projects lately we haven’t gotten to much on the inside.

I think the Halloween decor is fun but for the past few years we’ve just had it out for a week or so – any more than that and I start to feel overwhelmed by all the extra stuff. Last night we grabbed all the bins and I just let the Bub have at it. I let him put stuff wherever he wanted and we decided on a few things together. He had a blast decorating the main floor!

Since we don’t have the decor out long I always go cheap for Halloween – and I like doing things in numbers. The dollar store crows are now perched in the bathroom:

easy halloween decor

And the big dollar store googly eyes watch from the toilet:

googly eyes Halloween

We giggled like little kids when we finished putting those up. Well, he is a little kid, but I giggled like him.

I made these letters years ago – they’re just mdf craft letters and I covered them in Halloween paper:

BOO letters

So easy, so simple, so cheap!!

These little spooky votives are still one of my favorite Halloween projects:

Halloween votive craft

You can see how I did them here. Again, less than $10 for all of them easy.

We have a bunch of creepy sparkly spiders (sparkly spiders are the scariest, of course) so I stuck them on the wall in the foyer:

spiders Halloween decor

Gotta admit, they freak me out. I added them to the leaves of our new fiddle leaf and I think I’m going to have to take them off. I can only handle so much.

We have a lot of skeletons. I think they look pretty funny resting up against everyday stuff:

sparkly skeletons

Like, oh hello…just a skeleton hanging out. Chillin. This one finds something really funny or he’s terrified. I’m going with funny.

His friend outside is a funny guy too:

sparkly skeleton

I can’t remember where I got him but I know it was another clearance sale – I think maybe at Joann’s?

I especially love paper decor at this time of year. It’s inexpensive and hardly takes up any storage space – bonus! I picked up these creepy paper hands on clearance last year:

black interior door

They look smashing on the new black door. ;)

We use paper bats everywhere and I usually like to put them in one spot for more impact:

paper bats on wall

But the kiddo wanted to put them up all over so that’s what he did. I must admit it’s pretty cute to see them randomly flying around the house. There’s a few of them on the stairway, along with the infamous mice:

mice on stairs Halloween

After Mousegate I wasn’t sure I’d ever be able to put them up again, for real. But time heals all memories of mice in your house, right? They are pretty cute and they’ve become a tradition for us. :)

I’ve seen the idea of attaching googly eyes to photos and started it on the pictures on the stairs but our son HATED it. Like, hated. I stopped at two pictures – he’s right, it is pretty creepy looking. But pretty hilarious too.

Do you decorate your home for Halloween? How long do you have your decor up? I just love that my boy is still into it and wants to do it – it will be a sad day for me when he doesn’t.

You can see all of my easy and inexpensive Halloween decor through the years here. Have a GREAT weekend!