Cheater crown molding

Thursday, May 23, 2013 0 comments

Progress people!! It’s happening in the powder room! WHOOT!

I know I said I wasn’t going to show you much more before the reveal. I lied. :)

I don’t know if I’ve told you about the crown molding in this room before, but I thought it was post-worthy, because it makes installing crown SO easy.

I think I have written about it, maybe? I don’t know, remember it’s been five years.

Anyhoo, last I left you I was showing you the new paint color, and in this pic especially you can see how craptastic the crown molding looked:

Spell check doesn’t recognize craptastic. WHY?

I had installed the crown years ago and then never finished it. I know! I’m surprised too!

(That would be sarcasm if you’re new here.)

I installed the primed molding and then put one coat of paint on the cheater pieces (that I’ll tell you more about in a minute) and that was it – no more paint, no caulk:

I did fill the nail holes at least – but the putty was still on there, I didn’t even sand off the excess. ;)

Soooo. It was time to fix that. I started off giving it all one coat everywhere but the bottom. I was able to cut in on the top of the crown because of that lovely gap, but the bottom (that looked the worst because of all the painting I’ve done over the years) needed to be taped off with my trusty FrogTape:

painting crown molding

I used the yellow delicate kind because I had painted recently and because I just really like that version – it’s a bit thinner so it’s really easy to work with.

Everything got two coats and it looked SO much better. But crown still doesn't look just right till you get rid of all the gaps:

caulking crown molding

I still have these gaps in my office too, two years later and I still haven’t gotten up there to caulk all of it. Cause it’s about the most fun evah…can you blame me??

I used the little tool I told you about here to caulk and it worked great along the bottom and at the ceiling.

So now, the good stuff – I found these corner crown pieces years and years ago, before I knew how to cut crown molding: easy crown molding

Even if you know how to cut crown you know it’s still a major pain in the patoot, so these are AWESOME. They are just wood pieces you use on the outside corners (like above), and the inside corners:

easy crown molding

So instead of learning how to cut the angles just right, (I showed you how to do that here) or if you don’t have a compound miter saw – this is the stuff for you. You just nail it in and then the actual crown only needs straight cuts that butt up against them.

I love the little architectural flair they give a room! They are kind of expensive, so now that I know how to cut crown I don’t use them anymore. If you just have a square room they wouldn’t be that bad because the inside corner pieces are cheaper.

Painting and caulking crown is one of those things I put off, but when it’s done I can’t believe the difference it makes. Here’s the before:

And the after – bright white and look Ma! No gaps!:

crown molding corner pieces

You’ll notice the wood planks have been painted too, halleluiah! Now I feel like I’m really in the home stretch! Just need to finish painting the door trim and baseboards, get the other trim up over the planks, hang a mirror and then I can decorate it a little!

Have you mastered the crown molding cut? Or have you tried these cheater pieces? Someday I’ll have crown in every room of our house – I absolutely love it. And if you can install it yourself the cost isn’t bad at all!

Home Depot video shoot

Tuesday, May 21, 2013 0 comments

Hello all! First of all, I have to send out prayers to those in Oklahoma. We are just seeing all the news this morning and it’s heartbreaking.

I’m back today with a recap of the recent Home Depot video shoot at my house. When they contacted me about doing a video in the backyard a couple months ago I was all, sure, that sounds like fun! I don’t have to leave my house, low stress right?

Well then I realized I was doing interviews for three hours and the nerves started to creep in. ;) I gotta say, in the end it was actually a really fun day and I feel like it went pretty well. (Everyone else said so too, but I’m still not sure if they’re supposed to say that or what.)

The promotion was set up so that I could chat with about 15 other bloggers via the phone while I was taped. We were talking about the new Procter and Gamble cleaning items at Home Depot specifically -- they are great for outdoor grime and dirt. The bloggers and I talked about getting your outdoor spaces ready for the season and some fun entertaining ideas.

I’ll share one of the videos with you soon (I haven’t seen any yet – yikes!!) but for now I wanted to share what went into the shoot. It was mind boggling! The production crew came a couple weeks earlier to check out the house and patio, and when six guys walked in I started to realize what a big deal this was. ;)

The day of the shoot we had more like ten crew members and then the producer from NYC (thanks Evan!) and the PR contact from Chicago (hey Mara!). They were super efficient but still took a couple hours:

video shoot

There were monitors and cords and stuff everywhere! It was insane! (In a fun way!)

Here’s a better view of the kitchen:

video shoot

Thank goodness for the new, bigger kitchen table. ;) There’s no way all of that would have fit on the old one.

Speaking of, the old one served as our food station – both breakfast and lunch were catered in, ohh la la!:

Having the food brought in was actually a huge relief to me. All along I had been planning on feeding everyone and that was a huge thing I didn’t have to worry about that day.

The patio was as crazy as the inside – they moved everything around so the fireplace was the focal point:

video shoot

We had a beautiful, sunny day so the big screen was up to offer some shade for the shoot – I asked if they would leave it and they said no, dangit. :)

My sis was there for the day, thank goodness! It was a relief to have her there to help me prepare and just for support. She got a bunch of pics while I was getting prepped for the shoot:

video shoot home depot video shoot

Nice face:

I have to say, EVERYONE was awesome -- the crew, Evan, Mara – they all made it fun and it was surprisingly laid back, which is good for me. I feel comfortable in front of a camera and have done it numerous times in my life (both for blogging and in my previous life in PR), but if everyone is stressed and hyper it makes me nervous.

It was quite fun and even though I was nervous, I was way more relaxed than I thought I would be. I didn’t mess up too bad – except for the time I kept saying “cucumber” instead of couponer – over and over. And over. It didn’t help that I’d also hear everyone inside through my earpiece cackling every time I said it. :)

You know how you say something wrong a couple times and then your brain just quits on you and you just CANNOT say it right after that? Yeah. I think it took six tries before I got it.

Oh well, everyone needs some outtakes right??

It was a fun day and we flew through the interviews – the crew was packed up and the house was back to normal by mid-afternoon. It was a blast and I couldn’t have done it without my sister there with me:

thrifty decor chick

Love her. :)

The lovely folks at Procter and Gamble and Home Depot have put a little giveaway package together for one of you to win! You’ll get all the items I talked about that day – the Mr. Clean Magic Eraser Outdoor Pro pack, Mr. Clean Outdoor Pro spray, a roll of Bounty paper towels and a $50 Home Depot gift card!

P&G Outdoor Cleaning Pack

WHOOT! I have already tried the cleaning supplies and they rock! Anyone else obsessed with the Magic Erasers? Love them. And with the gift card you can kick off Memorial Day right with some flowers from Home Depot, or maybe some outdoor pillows? Hope the winner does something fun with it! :)

**This giveaway is now closed – the winner has been contacted.

All you have to do to enter is leave a comment here. Remember if you are anonymous, leave your email as well! This will be open through Thursday at noon.

No. 5

Monday, May 20, 2013 0 comments

Well today is the day…five years of blogging as of May 20th. Absolutely CRAZY!!

This is the longest I’ve stayed at one job – which is hilarious to me. I mean, back in the day I was at one company for longer than five years, but I moved around to different locations.

For the first time in my adult life, I am perfectly, completely happy where I’m at and have no desire to do anything else.

Contentedness in a career is a wonderful feeling and so highly underrated.

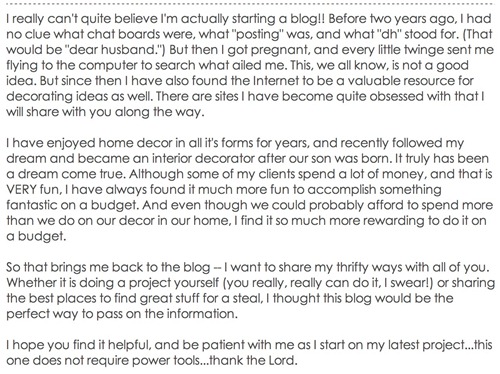
It all started with this post back on May 20th, 2008:
Screen Shot 2013-05-20 at 9.26.10 AM

I started this DIY blog back in the day of (mostly) only family blogs, as far as I knew. Many of my friends were starting them up to keep friends and family up-to-date on their kids. One day I got a wild idea – why not make a blog showing my friends and family how I do what I do?

That’s what it was for initially, just friends and family. I had NO clue there were other DIY/decorating blogs out there. I’d even get an occasional comment from a blogger but still didn’t really put it together.

Smarty, I am. I still marvel that I’m able to write a blog, seriously.

Funny that five years seems SOOOO much longer than that. When you’re documenting so very much of what you do it seems more like ten years. Five years sounds like yesterday!

In honor of my anniversary I figured I’d to a top five post – a few of my favorites and my best advice of course, after doing it this long.

My house has changed SO MUCH in five years. More than the average house I’m sure, but as I say, this is my gig folks. The best gig ever, so change is kind of expected up in here.

Here are my five all time favorite projects we’ve done to our house, in no particular order:

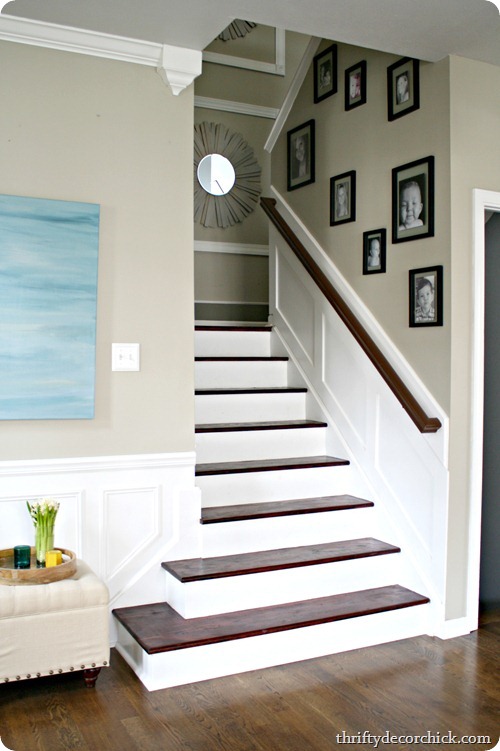
1. The stairs:
taking carpet off stairs

I recapped that project recently here – and you can see how they’ve transformed bit by bit over the years here. BIG impact for very little money!

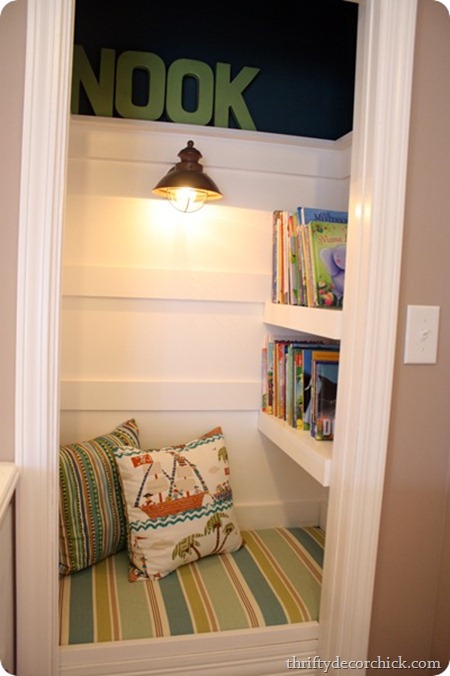
2. The Book Nook:
book nook closet

I still absolutely adore it!! We have plenty of storage space so making what had become an unused closet into something fun and quirky just makes me happy.

You can see more pics here and the how-to here.

3. My office:
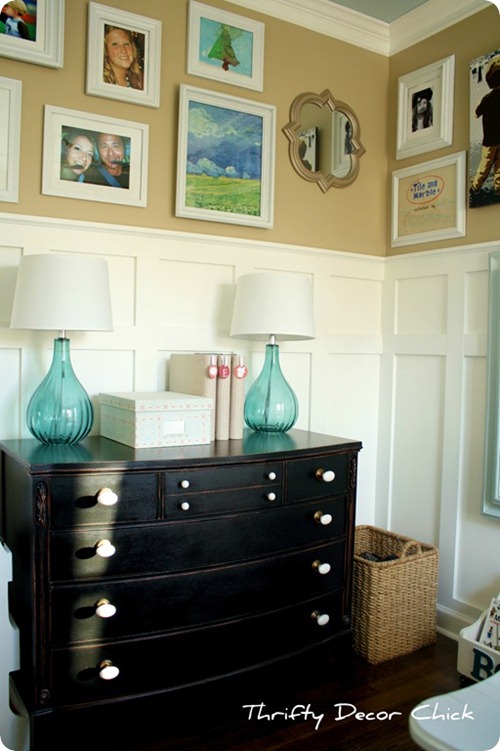
board and batten on walls

You have to see the before and afters to get the full effect here. What’s funny is when I finished the room I wasn’t using it a ton – and then the Bub went off to kindergarten this year and now I use it every day. (Before I blogged at night and would sit on the couch.) I love being in this bright, happy room. LOVE. It is so calming, so me and I am surrounded by so many faces and things I love.

4. The basement:
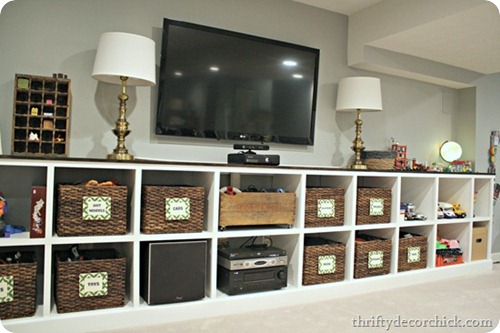
built in cubby organization

It’s been about a year now since the basement was (mostly) finished. It took about six months to take it from all cement to a really livable space because we hired out most of it and did it with cash, so we just did what we could as we could afford it.

At least once a week my husband and I will look at each other while we’re down there, sigh and say, “I love our basement.” Still…a year after being done. We spend so much time down there and truly enjoy it.

You can see more about those cubbies here and the whole basement transformation here. (And how we used to use it before it was finished!)

5. The patio: 

outdoor patio with fireplace

It was our first real, BIG project and yes, we hired out. (Lordy!) This is another one of those things that we’ve done that we are truly humbled by. Every night we are out there we talk about how blessed we are to have been able to do something like this. Our backyard is an oasis for us and it’s because of this addition.

You can see more of this area and our deck here and other outdoor spaces here.

Every few months I’ll freak out a little because I wonder if I’ll have enough “content” in this house. Like, is there enough to do to keep blogging about it? What I if I run out of projects? What will I do??

And then I LAUGH.

Blogging has been a blessing, and I don’t say that lightly. TRULY. I have met some of my closest friends through blogging, been on some amazing trips, met so many cool people – it is overwhelming and makes me emotional when I think about it.

Here are the top five COOLEST things that have happened since I’ve started blogging, again in no order cause they’re all just that cool:

1. Being on the Nate Berkus Show:

nate berkus thrifty decor chick

OK, I never actually got on the show in person (I did get a chance to go see him live!), but he did highlight my blog. I know many of you found me that way. :) He did such a great service to so many bloggers, it was such a thrill.

I was supposed to be on the show numerous times – I think I was contacted about ten times. Once I got everything ready, they got my travel booked, and then Nate had appendicitis and it was cancelled.

It was fine with me though – it was an honor to just be highlighted. :) You can see the segment here.

2. Paying off our debt:

dave ramsey thrifty decor chick

Other than the kids, this is the best thing, hands down, that we’ve done in our lives. My husband and I paid off $125,000 worth of debt years ago and haven’t looked back once.

I’ve been completely and totally thrilled to have worked with the Dave Ramsey folks a few times since then, it’s been an honor.

You can read more about our debt story here.

3. Being published:
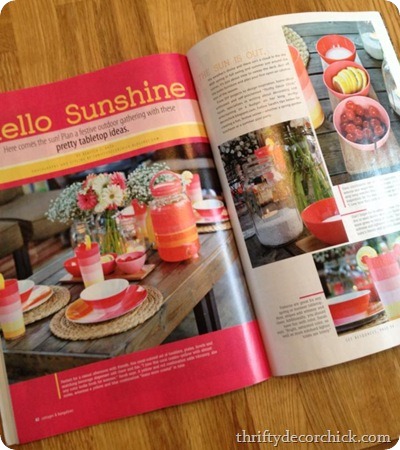
cottages and bungalows thrifty decor chick

I didn’t talk about it much (I mentioned it here), but it was SO cool! One of my outdoor projects was in the April issue of Cottages and Bungalows this year.

Thing is, I didn’t think my stuff would ever be in a magazine, and I’m not being aloof or just saying that. I know mags are including bloggers more and more and I am SO happy about that. I just think my house is too “normal” for a magazine. Does that make any sense? I mean, I think it’s beautiful and I’m so proud of it, but I don’t see it being different enough to be in one.

So that’s why that spread was really special to me – so exciting!

4. The Haven Conference:

haven conference

I partner with some lovely, amazing ladies to put on this conference (coming up in August). It is a lot of work but being there last year was one of the highlights of my life – overwhelming and humbling and so. much. fun. It was hard to put into words and still is. :)

5. Working with dream brands:

The first time a “big” name contacted me I thought it was a joke, or spam, or anything other than them being serious. ME? Part of me still feels that way every time I get an email.

I often think about what my resume would look like now, after blogging for five years. If I put it down on paper it would be pretty awesome, you know? Like all, yeah, I’ve worked with Home Depot and Target and cutie Nate kind of liked my projects and blah blah…holy CATS.

WEIRD people. Totally weird!!

And finally, I’ve covered lots of blogging advice before, but as a little recap, here’s my top five nuggets of blogging tips – take them or leave them:

1. Don’t do things for free.

Unless you’re just starting out. Early on, do it for free and show how well you can represent. After that, if you are established, you blog regularly, you work every day at it – it becomes a job (a fun job, no doubt). You are representing a brand and should be paid for it.

2. Don’t take every paid offer that comes to you.

Write your blog as you like to read others – you don’t have to take every opportunity if it’s not a good fit. (If you need the money to make ends meet, this does not apply to you.) I turn down partnerships often because I don’t think it works for my blog or my readers.

3. Make friends.

I covered this more in depth here. I would not be where I am today without blog friends to go to for advice, partnering with bloggers and sharing the love. You can’t blog in a vacuum peeps.

Well you can, but it would get awfully lonely in there. And dirty.

4. Keep some of your life for you.

I’ve talked about this a few times too but I am SO passionate about this. It’s OK if you don’t share every aspect of your life on your blog. Keep some stuff just for you and your family. Otherwise it’s easy to live your life as you would blog about it. Does that make sense? Early on in blogging I’d be doing random things with my family and the “this would make a great post” thought would come into my head ALL the time. I was obsessed.

Share your family, of course!! Your trips, your big events, your proud moments. It’s just OK if you keep some of it just for you. Really! It is!

5. Turn it off.

Four and half years ago if someone said that to me I would have looked them with crazy bloggy eyes and cackled at them all freaky-like.

Take a break. The more you blog, the more you take on, the more it will feel like work. And it is. So now I turn off emails on the weekends, I shut down the computer Friday afternoon. (I still surf and do fun stuff on it on the weekends.)

The longer I do this the more I’ve realized I HAVE to disconnect. It’s good for the soul. At least mine. ;)

Well there you go. Now here I am getting all teary eyed. And I said I wouldn’t cry. ;)

It’s been an amazing journey and I have all of you to thank. Some of you have been here for years, some for just a few days. I’m so grateful you come back. :) I’m looking forward to the future to find out what else is in store and so hope you will come along for the ride!

From the bottom of my heart – THANK YOU!!

House Happy

Friday, May 17, 2013 0 comments

Hello all and happy, beautiful Friday to you! It is a lovely day here today, although we may get some rain later. For now I’m enjoying it!

I’m back with another House Happy post, where I recap some of my favorite photos from around the house, Pinterest, Facebook and Instagram over the past few weeks.

It’s been a busy couple of weeks here so I’m perfectly content to just chill at home this weekend, enjoying the house and our yard.

This is one of my favorite weeks of the year around here, because my azaleas were blooming:

azaleas

They only have blooms for a few days, but it is FANTASTIC when they do. Long time readers may notice the window boxes are gone – I took them down this week because they were literally falling apart. (Figured I’d spare the neighbors that much longer.)

I’m planning to make more soon, but while the azaleas are blooming it’s kind of nice to just let them shine. ;)

Because I may or may not have backed over a bike with my SUV a few weeks ago, we were in a local bike shop getting a new tire when I fell in love with these bright bicycles:

bright bicycles

I WANT!! All I would need is a basket and a bell!

I pinned these Ball jars (from HGTV.com) the other day because I loved the idea to paint them metallic:

metallic mason jars

I’ve painted some of my mason jars but never thought to do a shiny metallic like this. Wouldn’t that be so pretty for a wedding or shower this summer? LOVE!

Remember the super easy pineapple cake I told you about? Well many of you said you’ve made it with other fruit fillings as well, so I tried the cherry version:

cherry angel food cake dessert

And it was REALLY good too! I think I still prefer the pineapple, but both are yummy. I’m going to try strawberries too. :)

It was a thrill when I got the Ballard Designs catalog a few weeks ago and saw this shot:

photo 4

I was there to see this photo shoot in action and it was a BLAST! I still need to tell you all about that trip. It was surreal to see that same space in the catalog!

I love finding my boy sitting at the new kitchen table:

DIY farmhouse table

We have so much more space on there now, I absolutely love this table! I was a little careful with it at first, but I’ve found the top holds up GREAT. No worries anymore. :)

I had a video shoot with Home Depot this week, so I’ve been working like a mad woman to get the patio ready for it. I took a minute to sit down and enjoy it last week:

patio with fireplace

Facebook folks were loving the pillow – isn’t it awesome?? I found it at Home Depot and it works perfectly with the colors on our patio!

The good thing about having to have everything prepped for the shoot was that most of the outside is ready for us to enjoy for the season. I cleaned my house really well too, but I don’t think anyone noticed by the time the crew set up:

photo 2

It was CRAZY! A really fun experience, I’ll tell you more about it next week!

I shared this one on Facebook too, perfect for Mother’s Day:

Mother's Day cartoon

So worth it and so true! :)

Have you seen the new Threshold items for summer at Target? I’m obsessed with the whole line. I thought this shadowbox art was so pretty:

target shell art

And I took a pic because I have all of the pieces to make this at home – a shadowbox, burlap and shells. I’m going to try it!

I pinned this pretty purple plant from bhg.com – it’s called a Oxalis purple clover I believe?:

Oxalis purple clover

Holy canoly, that would look so amazing on the patio!! Anyone have one? Are they a shade plant or full sun? I’m going to try to find one today. :)

Hope you have a wonderful weekend! Anything fun planned? We have baseball and stuff at hubby’s school, and of course cheering on our Pacers!!

(Your) little things make a big difference

Thursday, May 16, 2013 0 comments

Hey there all! I’m enjoying this lovely Thursday and relaxing a bit today – it’s been a crazy busy week as I prepared for a big video shoot with the folks from Home Depot yesterday. We shot it outside on the patio and it was really fun and went great. I will tell you more about it SOON!

For now I want to show off a few of those who linked up to the “Little Things” party I threw at the last minute a few weeks ago. I LOVED this link up – I may do that again. It was so fun to read through the posts!

I found a few (it was hard to stop) to highlight, so check them out!

Carmel at Our Fifth House added some pretty hardware to the back of her chairs for some bling:

hardware on back of chairs

I’ve always wanted to do the same – I just think it’s a cool unexpected touch.

I loved this simple trash can redo at Batchelor’s Way:

trash can with painted numbers

Inspiration for Moms shows how to spray paint lamp shades:

swing arm lamps above bed

I LOVE how that room has come together – so classic!

Lori at Family Love Home finished off a basic shelf with some trim:

laundry organization

It’s such a little thing but makes such a big difference, right?

I loved all the pretty vignettes over at Shine Your Light:

art between windows Lisa talks about finding contentment with the little spots in your home, it’s a great read!

Danielle at Storypiece shared how she put together some simple organizational tags:

chalkboard labels

I’ve been trying to decide on simple tags in my craft room and I think this is it!

I loved the duct tape art at Complete Package Mama:

duct tape art

Such an easy, inexpensive way to make art!

I thought Tami’s little butterfly garden at Curb Alert was so sweet!:

butterfly garden

I love that she used a little corner and created a fun spot for her kids – I so want to do this!

No. 29 Design used some cute IKEA hanging baskets to clean off her kitchen counters:

ikea hanging storage

I have a couple of these and have never found the perfect spot for them – I love this idea!

Proof of the power of spray paint – I love the blue chandy at Three Dogs at Home:

blue spray paint chandelierAnd finally, but certainly not least, I loved this simple organization idea at Heroth Home:food canister organization

Brilliant! Cheap! And cute! What more could you ask for? :)

Ack! I love it all! You guys linked up some great stuff! If you missed this one, go here to check it out!

Thanks for linking up! As always, if you’d like to Pin any of these posts, please do so from their respective sites.

I still say some of the smallest things we do to a space is what makes it. It’s all about the details!

Powder room paint (with an EZ twist!)

Tuesday, May 14, 2013 0 comments

Hey hey all!

So a few weeks ago during our conversation a conversation with a friend I mentioned that I’ve only painted most of the rooms in our house once. She kind of laughed and didn’t believe me, but it’s true – half the house was the original color for eight years, and the master and bathroom, my stepdaughter’s room, the kitchen and family room and more have only been painted once and have stayed like that forever.

There’s a couple rooms I’ve painted like eleventy billion times though, so I think that’s what led to her confusion. But I’m on a mission and most of those other rooms I mentioned will be painted…someday?

The powder room is one of those rooms that’s been painted a lot -- five different colors to date. Two of those within the past couple of weeks. Over the course of two days. ;)

Well the folks from HomeRight contacted me a few months ago asking if I wanted to try out one of their paint sticks and I was like yeaaaahhhh!  I was so excited when they arrived and I got two! One is just a normal paint stick and one is the EZ-Twist, special!:

Home Right paint stick

I needed to get the powder room painted – there is so much other stuff to do but I’m avoiding painting that wood paneling again till I absolutely have to, so this was easy in comparison. I’ve had that blue color up there (I honestly can’t even remember what the name of it is it’s been so long), and then I experimented with the red and I just needed it all covered and DONE.

I went back and forth on colors before deciding I really wanted a nice neutral. The art I’m planning to hang and the accessories will bring in a ton of color, so I wanted a nice, clean backdrop to it all. I had half a can of the Analytical Gray (Sherwin Williams) left so I figured why not use it up!

OK so here’s the thing – it seriously took me longer to get the paint stick out of the plastic packaging than it did to figure out how to use it. ;) It wasn’t hard at all – you just take the little nozzle jobby and clip it on the side of the paint can:

Home Right paint stick

Then you place the stick on it (it’s already assembled when you get it), flip a little switch, then pull back on the stick and watch the paint get sucked in!:

Home Right paint stick

The first time I used it I didn’t suck enough up in there (you want to make sure the stick is mostly full) – but you just place it back on the nozzle and pull again to fill it up more.

I gotta say, I really, really liked this tool. I talk to myself when painting and I may have mentioned a few times “this is so cool!!” to…myself:

Home Right paint stick

A picture of the blogger!! Whuuut!

When I paint I have this weird fear that I will run out – even if it’s a tiny room, I will use as little on the roller as possible. You should not do this by the way. :) I end up pushing too hard to get it out of the roller on the wall, and it ends up killing my shoulders by the time I’m done.

This stick totally took care of it all for me – I just twisted as I went to get more into the roller. I was surprised at how little I had to twist too. And it went on SO stinking smooth. Every time I paint I have to watch for the lines of globby paint along the side of the roller because I push so hard. I didn’t see any while using this.

So it took me no time at all to get the walls done – seriously like ten minutes? I still had to cut in, but I realized pretty quickly that the color wasn’t what I wanted. It was too dark for what I envisioned – this color works great in our big open spaces in the house with lots of natural light, but in here it was a little drab.

So I went back to the paint deck and went with Agreeable Gray (SW) instead. I ended up cutting in first this time:

Analytical Gray Sherwin Williams

And then I used the paint stick to paint…again. :)

I LOVE it!!:

Agreeable Gray Sherwin Williams

It’s a great neutral backdrop for the room. So light and pretty, it’s just perfect. And it still pops plenty against the white wood. (Ignore the paint all over the crown, it all still needs painted and caulked from years ago. Surprised?)

I especially love how it looks against the light blue ceiling. You know how I love those painted ceilings!

I’ll probably only show you one more part of the room before the final reveal – maybe by next week?? (Crossing fingers, toes, everything.) My to do list is getting crossed out slowly but surely – but then I remember all kinds of things I need to add to it too. ;)

Overall I really liked using the paint stick and I will use it again – it made the whole process go much easier and faster. The only part that takes time is cleaning it out – but after doing it once it was much faster the second time.

The good news is there is progress in this room, the best news is the lovely folks at HomeRight are offering TWO of the PaintStick EZ-Twists to two of you! Awww. yeah!

Just leave a comment here by Thursday the 16th at 9 a.m. to be entered to win. (Leave an email too!) That’s it! (And if you’d like to pick up one yourself you can find them at Lowe’s.) Have a LOVELY day!

**This giveaway is now closed! Winners have been contacted.