Staircase nook

Wednesday, July 31, 2013 0 comments

Hey hey all! Well, it’s about that time! I’m off to Atlanta today to prepare for the Haven Conference that starts tomorrow. It’s been a year of planning and I can’t even believe it’s already here! SO excited to see everybody.

So I finished up a quick little project this week that I’ve been meaning to do for months. Or a year. A year and a few months.

We have a little ledge/nook/cut out spot in the basement staircase that has been sitting half way done for that year and a few months:

You may remember that I installed a wood wall on the main wall in the staircase about this time last year. I still LOVE that wall. So very much.

Before we had the basement finished the wall next to it going down the steps had a weird cement wall bump out thing. Instead of drywalling all the way up I asked them to make it a little ledge instead. They installed a wood piece that I was planning on painting later, hence the stain spatter I didn’t worry about:

But since then I’ve decided I wanted it stained instead. I’m kind of obsessed with the look of the dark wood against the gray blue walls (Marina Gray by Ben Moore) and white trim down there.

So I needed to sand off that stamp and the stain dots:

sanding before staining

It just took a few seconds and I was ready to go – then I taped everything off with my Frogtape really well. I find it’s hard to keep stain from going everywhere since it leaks easily and spatters all over the place. (It could be the operator, who knows.):

prepping for stain

After I wiped everything down well (and let it dry), I grabbed my dark walnut stain and went at it:

how to stain

Remember when you stain to work quickly and to keep the “wet edge” – if it dries at all during the process you’ll see where you left off. OH, and wear gloves!! Trust me – no matter how hard I try I always end up with stain on my hands.

I let it sit for a few minutes and wiped the excess off. I only usually do one coat – I find that’s plenty for the color I want.

While it dried I started hanging the frames I’ve had leaning there forever. Most of them are pics from the Macy’s Thanksgiving parade/NYC trip I showed you here, but there was one collage my stepdaughter gave us last Christmas (so sweet!) that I wanted to include too.

Here’s a little tip when hanging pics that have two hangers instead of one – just tie a piece of string or wire between the two:

hanging picture without a level

Then hang that on the the nail. SO much easier. I mean, sometimes what you’re hanging is heavy enough you’ll want two nails, but most of the time I find one is just fine. And this way you don’t have to worry about measuring, finding a level, all that stuff. Ain’t nobody got time for that.

Like all of my gallery walls, I just kind of put stuff here and there – yes, that meant a few extra holes in the wall but they’re tiny. The wall will survive:

matching frames gallery wall

I was trying to use frames that I had on hand and I liked the (mostly) matching frames, so I didn’t go crazy trying to fill empty spaces. The “S” we’ve had for years and it perfectly filled one spot that was bugging me.

The ledge has plenty of room for accessories, but for now I just left a couple candlesticks we had here before (they ended up on there because I was too lazy to take them all the way to the storage room):

matching frames gallery wall

They are fake candles and they operate on a timer, so it’s kind of cool to have that little glow as we walk down at night.

It was a quick project and I think it turned out pretty cute! I love how it looks with the planked wall:

wood planked wall

Next up in this space – touch up the wall and ceiling paint and install chunkier baseboards. Maybe I’ll tackle those in another year. Baby steps.

So are you loving gallery walls? I am and I don’t think they’re going anywhere soon. It’s such a personal, easy way to fill wall space! And remember you can find frames at Goodwill for super cheap and spray paint them. One color for all of them will unify frames no matter their design. 

Growing hydrangeas (not killing them)

Monday, July 29, 2013 0 comments

Hey heyyyy! How was your weekend? Have I mentioned how wonderful our weather has been? One or 50 times? Yeah. It’s been awesome. 51.

I’ve been spending SO much more time outside this summer, I’ve truly enjoyed this season. I’ve been planting a bunch of new things, transplanting some, just enjoying our outdoor space and the flowers.

I wrote last summer about my pathetic hydrangeas and how I was the pretty much the worst hydrangea parent EVER. They hated me. I’ve learned a ton about them since and figured I’d share my new knowledge. (So many great tips in the comments of that post!)

Mine still have a long way to go, but I as long as we don’t have a scorching summer next year, I think they’ll do even better. It’s SO exciting to see them actually grow and bloom this summer! Seriously a thrill after I’ve worked so hard to help them along.

They were sad and pathetic last year, really. The biggest surprise I got a few weeks ago were the start of blooms on my limelight hydrangea. I’ve had it three years people – not one bloom till now. Here is was last summer and now:

how to grow hydrangea limelight hydrangea

It’s now FILLED with beautiful white blooms! They’re all only about half way done too, so in a week or two it will be full of puffy white flowers:

limelight hydrangea

So here’s the first piece of advice – the sleep, creep, leap saying is true. Most plants I have planted follow this – the first year they don’t do much, the second the come along a little bit and the third they leap! I got this guy on clearance at the end of the season two summers ago and last year you can see that it grew, but didn’t do much else.

The third year (this year), it has doubled in size and is full of blooms. I think with hydrangeas you just need to have patience. Which is hard when you buy one full of blooms and then it poops out on you.

Here’s another biggie – you will see hydrangeas everywhere in full sun all the time – I see them at restaurants, stores, churches, drive throughs – everywhere. But mine did horribly in full sun: 

full sun hydrangeafull sun hydrangeafull sun hydrangea 

I showed you these last summer – I’d had them for two or three years at that point? Not one had ever bloomed, they all barely grew, it was just sad. Sad sad SAD.

Now those three look like this:

how to grow hydrangeas

The one on the left has grown a TON from where it was (it was the smallest one) but it’s still not blooming. The other two have done great! They just don’t have a ton of blooms right now because I cut so many of them a few weeks ago. ;)

These are the mophead variety, and they have really strong, beautiful leaves too:

mophead hydrangeagrowing hydrangeas

The leaves on that pink plant are especially hardy, dark and pretty.

Tip two – they do best in morning sun and afternoon shade (or dappled shade). Mine in afternoon shade (these above) do even better than those in the back that get the dappled shade. If you are having problems getting yours to grow – try moving them to a spot where they’ll get some rest from the heat in the afternoon.

I found some PeeGee trees on clearance a couple years ago and was so excited – they are basically a hydrangea tree. The year I planted them they did great for the rest of that season, but last year they looked like butt, like the rest of mine:

Pee Gee hydrangea

Now, they are amazing!!:

Pee Gee hydrangea blooming

They are both blooming and full and doing great.

Here’s the thing (tip three) – hydrangeas need MEGA water. I mean, it’s in their name. :) Last summer was the complete and total opposite of this one here in Indiana – super hot, drought conditions – it sucked. This year we had a really wet early summer and it’s helped tremendously.

I just watch my plants – if they start to wilt at all I know they need water. They need a lot of it, but watch how you water them too. I’ve got one mophead that has a fungus on the leaves (it hit one of my peonies too) because we’ve gotten so much rain. If you can, water them at the base of the plant (not with a sprinkler) so the water goes right to the roots and doesn’t sit on the leaves. (The fungus will not really hurt the plant so I’m cutting off those leaves and letting it be. If it had happened earlier in the season I would have used something on it.)

The Pee Gee tree is a paniculata hydrangea, like the limelight I first showed you. These two have the more cone shaped flowers:

pee gee hydrangea bloom

I much prefer the big round blooms, but these are beautiful too. They turn the most beautiful pink/green in the early fall – they are just gorgeous! I used them in this post a couple years ago: pee gee hydrangea fall

Aren’t they pretty?

I have about ten hydrangea plants out back now, and this one was my most recent addition:

pink hydrangea mophead

I shared it on Instagram – it was in full bloom when I got it and looked amazing! This plant was HUGE (I got it at a local nursery) and was $30 something dollars – you can find them half that size for the same price, so make sure to go big!

Those flowers are now done and are turning brown but the plant is doing great:

pee gee hydrangea

You can see my two PeeGee trees better here – they start to droop a bit as the blooms get bigger. (The one on the left is ahead of the other one by about a week.)

That brings me to another tip (number four?) – plant them in early summer or late fall if at all possible. It’s a lot of upkeep to keep them healthy and hydrated if you plant in the heat of mid-summer. I think the best time would be early summer so you can enjoy the blooms all season, but you can get some killer deals on them later in the fall, so it’s a hard call. I also think if you plant in the early summer you’ll have a better chance at a healthy, blooming plant the next year, since it has more time to get settled.

That huge mophead above was blooming pink when I bought it and the guy at the nursery said they will turn blue in our soil unless I changed the acidity. I have others that are blooming pink so I don’t know if it’s just this type? I was happy with that though because I have white, purple and pink and wanted blue:

blue hydrangea

He was right! ;) The new blooms are blue.

Behind that one is a climbing hydrangea I planted last year:

climbing hydrangea

Again, the plant is doing great, but not a bloom in sight. It’s not going to bloom this year at all, I can tell. I’m moving that one to a different spot soon so we’ll see how it does there.

Around the corner from those are a few more – mostly mopheads and one surprise lacecap:

lacecap hydrangealacecap hydrangea 

This is why you want them to be blooming when you buy. The lacecaps are more delicate – they have little bitty flowers that grow in the middle of the more traditional looking blooms. They are beautiful, but I just prefer the bigger fluffy ones. I am excited to see how these look when they are all blooming though!

Here’s my final big tip – I don’t prune my hydrangeas and they have done great this year. I mentioned earlier this year that I had pruned them and I misspoke a bit – I just (mostly) took all the dead wood off.

This can be tricky because sometimes it’s hard to tell between the normal and dead wood. Most hydrangeas bloom on dead wood – so you want to keep those ugly sticks like mine had last summer:

hydrangea grow on old wood

But I think it helped mine a ton to pull the dead wood out – they just shot up when I did that. I don’t know if it was just coincidence with the timing, but it seemed to help. I just pulled the dead stalks out of the plant – it will give easily if it’s dead. If it doesn’t, leave it.

I did trim down the Pee Gees just a bit though – just some of the tips that were total toast. And it seemed to work! I did this in May of this year – I’ve heard that’s a good time to do it if you’re going to. So I won’t cut them down this winter, and at best I’ll do a tiny bit of pruning next May, but that’s it. Otherwise I’ll leave them alone.

So that’s about it – I’ve learned a lot over the past year! I was determined because hydrangea are one of my all time favorites and I LOVE having them to cut and bring inside:

pink white hydrangea  mophead hydrangea pink white purple hydrangea in wood box dresser as entertainment center

Mine still have a long way to go – most are still tiny compared to a mature plant. But they are doing SO much better than the past. I think I’ve finally figured out how not kill them! Bonus!

Here’s a few other tips:

- If your climate is too warm for hydrangeas, consider the Pee Gee tree. It loves full sun so it should do better for you.

- You can change the color of your blooms with some stuff from the nursery or hardware store, or there are DIY methods too. (I’ve heard nails, pennies, etc.) The color of your blooms depends on the acidity of your soil. (Other than the white ones – those can’t be changed.)

- It seems like they are high maintenance, but once established hydrangeas are easy to take care of – they just need WATER.

- You know those planted hydrangeas you find in the spring/early summer at grocery stores? Yeah, they aren’t really meant to be planted. I had no idea! Go here to read more about that. I still think my one plant that isn’t blooming may be one I got from the grocery that I planted years ago. If it doesn’t bloom next year I’ll replace it.

I hope that helps any of you who have struggled with growing this beautiful plant! Again, I’m no expert but I’m getting there. ;) I think the change I made that made the biggest difference was where I planted them – the afternoon shade is key, at least at our house.

Are you a hydrangea lover? Any great tips I’ve missed? Have you tried and failed at these?


**For more on that DIY wood trough with the flowers in our family room go here!

When money is tight

Friday, July 26, 2013 0 comments

I don’t know about you, but there have been times in my life when money was T.I.G.H.T. I mean, on the floor of the car, reaching under the seats, trying to find a dollar in change to get enough gas to get me home or to work. (That’s when gas was cheap!) ;)

I learned a few BIG things over those years – one, not having money is one of the scariest, most unsettling feelings ever. It makes you feel completely out of control of your life. But I realized there were certain things I could do that would make me feel like I had control again and doing those things would help tremendously.

Although things are different for me now, there are certainly still times when cash is low – we are adjusting to a definite change since my hubby has retired from teaching. We planned for it and know things will even out so it’s not a scary situation, but it’s easy for those feelings of fear creep back in. It’s silly because my situation is completely different from years ago, but when the bank account goes low and the budget is spent for the month, I can’t help but feel that again, just a little. I will for as long as I live – you just don’t forget that feeling. :)

There are a few things that I’ve always done at times like that – and each of them gives me a sense of having control over my life. The first one may sound a little unusual – but it’s always worked for me.

I clean my car. :)

Now, my car is the thorn in my organizational side. It is just a space that easily gets messy and full of STUFF and I let it get out of control all. the. time. My husband does too. Maybe it’s the creative side of us? ;)

car disaster

Back in the day it was my mom’s car that I would do this with, but I would gather up change from around the house (or the car!) and drive to the car wash place and use their vacuum. I know you can do this at home and save a couple bucks, but for me it’s always getting out and driving there that helps too. When you don’t have any cash you’re not getting out as much so the drive was usually much needed.

I did this the other day and it ALWAYS makes me feel better – just throwing trash away, vacuuming the whole thing – it seriously works! If you are extra ambitious you can get even more detailed with it and maybe clean the outside (at home with the hose). But I’m rarely that good. ;)

It’s just a little thing but to this day it makes me feel better!

Depending on the state of your car, the next one goes hand in hand, and it’s to purge. Or decrapify as I like to say. If you’re like me you’re not always totally on top of stuff around the house when you’re feeling down about something. And again…I think what’s most important when money is tight is to feel like you have control over your home and life.

Going through the closets, the cabinets, the clothes and losing a few pounds of stuff feels SO GOOD. I cannot stress how amazing it feels when you see a pile ready to go out the door:

purging stuff out of the house

Maybe this is just me? All I know is it makes me feel so accomplished, so light and ready to conquer the world.

I wrote a post years ago about what to do with all that stuff too – you may just make some cash from that pile! I break it down into a few different areas – consignment, donation and recycling.

And finally, one that goes hand in hand with purging – organizing what’s left. Like decluttering, it won’t cost you anything! I mean, of course you can always add pretty baskets or organization, but most of the time just reassessing what you already have is enough: 

messy coat closet organized coat closet 

You can get creative with scrap wood, shoe or diaper boxes – whatever! Make labels with your printer or paint chips or scrapbook paper – it doesn’t have to be fancy!

Next month my plan is to get the house decluttered once again! I want to get it done before school gets going in full gear and before the birthdays and holidays later this year. I’m so motivated right now – I don’t know why but I feel like it’s spring instead of late(ish) summer. I have this desire to clean out and organize the whole house!

So what do you do when funds are low? Do you have any go to projects like my car clean out? Like I mentioned, I learned over the years that, for me, the way to fight the fear that comes with financial stress is to figure out something that makes me feel like I have power over my life – and all of these things do that for me, whether money is tight or not!

Have a GREAT weekend!!

DIY tufted headboard tutorial

Wednesday, July 24, 2013 0 comments

Hello all! I’m so excited to share more about how I made the new headboard in our bedroom. I shared more about the start to this room redo, the new bed and the headboard earlier this week.

I’ve made my own headboards (and for friends!) for years – even before blogging. It’s seriously one of the easiest DIY projects you can do and you will save SO MUCH money doing it on your own.

The headboard part I was used to – but I was totally intimidated by the tufting part. I’ve never tufted one because it seemed like it would be hard…but it is not a big deal! For real, it wasn’t bad at all.

So here we go – I new the shape I wanted the headboard to be for awhile, but I just found out the other day that it had a name:

different shapes of headboards

I wanted the Belgrave look, which was totally easy to DIY. First up, Dad came down and we used his truck to pick up a big piece of mdf at the hardware store – it was a big four by eight foot piece and the Lowe’s Guy cut it down for me:

DIY tufted headboard

I wish I would have taken pics of how I cut the corners out, but it was so quick. Dad and I just searched the garage for something round (and used my bird food holder). I held it up on the corner and figured out how big of a cut out I wanted, then did some quick measurements to make sure it was even on both sides. Then I traced the bottom of the can and cut one side out with the jigsaw. That first piece is all you need to make the second one – just flip it over and place it on the other corner, trace, and you’ve got a mirror image.

I hope that makes sense – it was so fast I didn’t even think to take pics.

Dad helped me take the board upstairs where I went to work! I showed you how I made the headboard in the Bub’s room and this was nearly identical till I got to the tufting part.

Like that one, I used mattress pads instead of foam from the craft store:

foam mattress for upholstered headboard

Why this instead of regular foam? One word – cheaper. ;) Foam is a petroleum based product, so it goes up with the price of gas. Which means it’s just going up and up over time. I haven’t even check the price lately but for three inches of foam for a nearly 80 inch headboard wouldn't be cheap. The size was another reason – I would have had to use numerous pieces of foam to cover this and when you use the mattress pad you can get one big piece.

I had one I had picked up on clearance years ago (look for the XL twin sizes after back to school – you can find them for cheap!) but it was too small for this headboard. So I ended up with a bigger size (queen I think?), then ended up going back to get another one to do two layers because I really wanted it super soft.

One of the things I grew to dislike about our old headboard was how hard it was. I mean, it was wood, so yeah. And it had a curve to it so our heads never fit against it. First world problems. This time I made the headboard tall and cushy that we could comfortably lean against it.

Once the foam is down, you want to secure it with a layer of batting or thin fabric. I used batting first just because, again, I wanted this super soft. And I already had some, so that helped too:

DIY tufted headboard

Then I used a piece of muslin I had in my stash too, to cover everything again. This just secures all the foam and gives you a nice base for the final fabric.

Speaking of that – after all that I was ready to finish it up – and because I was feeling lazy and didn’t want to drive the extra 15 minutes to the fabric store, I actually shopped the drapery aisle at Target:

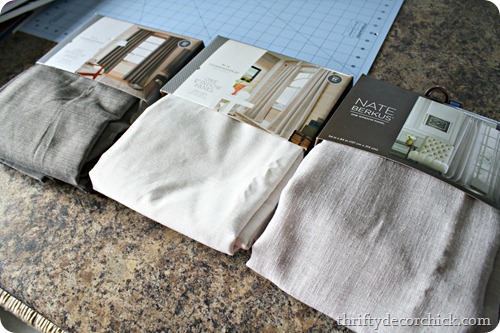
I wasn’t sure exactly what color I wanted so I grabbed a few. ;) The two on the left were $17 for a panel – which compared to a couple yards of upholstery fabric is pretty good.

Problem was we weren’t crazy about any of them when we tried them out. One was too light, one was too blah and one was too dark.

Soooo…the next day I went to the darn fabric store. ;) I needed the stuff to tuft the headboard anyway (at first I wasn’t planning on tufting. Scared, remember?) so I took a quick look through the fabrics and found one I LOVED in the suit fabric aisle.

Before I used that I figured out where I wanted my tufts and drilled the seven holes:

DIY tufted headboard

I just wanted it to be a simple design and some of the tufting I see is just too much for me. So when I did my math I decided to just do three across the top and four under that. That’s it – anything lower would always be covered by pillows or the mattress so I didn’t even worry about the bottom.

After the holes were drilled I added the final fabric:

DIY upholstered headboard

By the way, years ago I tried the electric stapler you can find at the hardware store (about $30) and it is kind of a pain in my butt to use. It gets jammed and the staples don’t go in evenly no matter what I do. I always revert back to my regular stapler (above) – it takes more muscle but that’s good for ya. ;)

Sometimes the corners can get tricky, so I’ve always used a simple method – start with the middle, then each side, pulling tight each time:

upholstering corners of headboard

For the curved corners I just grabbed the fabric and stapled as best I could:

upholstering curved corners

Remember…no one will see this part. Seriously, the back doesn’t matter. Do what you gotta do!

Here is is in it’s (almost) finished state:

DIY upholstered headboard

Getting there! The suit fabric is like a gray linen and looked so good. Way better than the drapes I picked out – I returned those.

Now the part I dreaded…the (shiver) tufting. So not hard. At all. All the stuff I needed was in the same section at Joann’s. I picked up this waxed thread and it rocked:

wax thread for tufting

It made this SO easy. More on that in a minute.

I grabbed some buttons too – it’s so easy to make your own fabric-covered buttons:

DIY buttons

I just used scrap fabric to make them all. Making buttons is fun.

So the tufting was a breeze – I couldn’t believe I had put it off all this time! I did poke myself a couple times, but overall, easy. :) First up, I threaded one of my long upholstery needles and made a little knot at one end, then stapled it to the back of the headboard:

how to tuft a headboard

Then I pushed the needle through the headboard, threaded the button on, and pushed it back through to the back. This is where the waxed thread comes in super handy – it kind of held the button where it was while I secured it to the back. Regular thread would slip and be hard to keep where you want it. This worked GREAT.

I would just put a staple in the back of the headboard, but wouldn’t push super hard on the stapler, so it didn’t go all the way into the wood. Then I was able to wrap that thread around it a few times, then hammer it down to secure it. (Pic on the right.)

I didn’t pull each button super tight – I didn’t want it to be a deep tuft. Just a little bit of tuft. And there is an easier way to do this by the way – you can just thread both ends of the thread on the needle with the button already on it, then put it through from front to back and then secure. But that method didn’t work for me because the waxed thread was so thick.

I was THRILLED with how it looked! I finished it up with some nailhead trim along the sides:

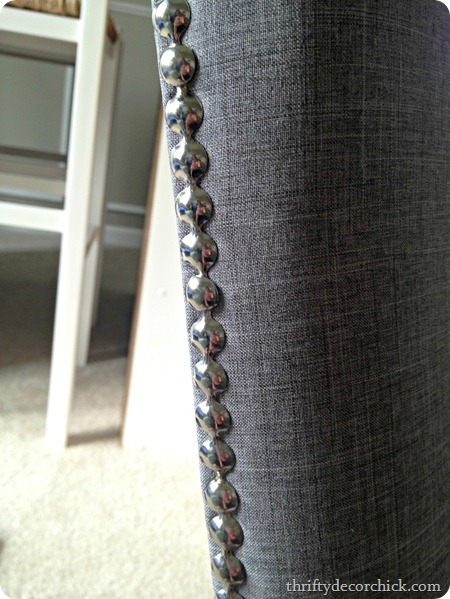
The particle board I used to make the headboard was 1/2 an inch thick and I went that size on purpose – so these would have something to grab onto. Any thinner and it would have been hard to get them in well.

I’ve never used the connected nailhead trim (I usually just do them individually) but wow, this made it so simple! The nailhead stuff is $21 for five yards, but I had two coupons so I got it for about $10. :)

I hung this up the same way I did in the Bub’s room – I just used picture hanging jobbies:

hanging a headboard

I figured out where the studs were and screwed into those in first, then that determined where I put the hangers on the back of the headboard.

When we got it hung I was so dang happy with how it turned out!: diy tufted headboard

You can see the nailhead trim better in that pic. From the front you don’t see it as much, but it’s a great little detail when you get up closer. I love it!

You can see there why I didn’t add any buttons any lower too – they’d just be covered.

Many of you have asked about the new bedding – I found it at HomeGoods earlier this year:

It’s by Hillcrest and it was a duvet cover and shams for $40. I had been looking for new bedding for months and just happened to find this, new sheets (they aren’t on now – they are darker and I’ll put them back on later in the fall) and the small pillow on the bed all in one trip. None of them are supposed to go together but I think they work well!

So far with what I made on the old bed, I’ve still got about $300+ to spend – I think I may make money on this redo! That’s what I’m talking about.

You can find upholstered and tufted headboards all over the place, but I promise you they are not hard to make on your own! It does take some time so just be patient with it. But you will save tons if you DIY this one -- the Pottery Barn bed on the left is $1000 for a king (gulp), the Ballard Designs on the right is $500+:

 Pottery barn upholstered headboard ballard designs camden headboard

I think mine looks pretty darn good for less than $100:

DIY tufted headboard

Here’s the break down on cost:

Wood: $15
Foam: $45
Fabric: $8
Buttons, nailheads, etc: $25

Total was $93! Aww yeah. And I have wood, foam, nailheads, buttons and thread left over to use on future projects.

If you went with one layer of foam/egg crate that will go down about $20. I had the batting and muslin but only one of those is really needed and they are both cheap. Of course if you skip the tufting that will help too!

Overall I’m so happy with how it turned out. And it is SO much more comfortable than our old headboard. Have you ever made your own? Did you find it easy to do? Have you ever attempted the tufting? Are ya sceered? 


**I’m getting more and more done in this room! To see how I updated old nightstands for the room, go here. And see what color I spray painted the brass lamps in this post! You can keep up with all of this room’s updates here.