Showing posts with label crafts. Show all posts

$10 and under Halloween

Friday, October 24, 2014 0 comments

Happy Friday to you! Only a week till the end of the month and Halloween, can you believe it? I can’t. We’ve had our Halloween decor up outside for a while but because I’ve been focused so much on DIY projects lately we haven’t gotten to much on the inside.

I think the Halloween decor is fun but for the past few years we’ve just had it out for a week or so – any more than that and I start to feel overwhelmed by all the extra stuff. Last night we grabbed all the bins and I just let the Bub have at it. I let him put stuff wherever he wanted and we decided on a few things together. He had a blast decorating the main floor!

Since we don’t have the decor out long I always go cheap for Halloween – and I like doing things in numbers. The dollar store crows are now perched in the bathroom:

easy halloween decor

And the big dollar store googly eyes watch from the toilet:

googly eyes Halloween

We giggled like little kids when we finished putting those up. Well, he is a little kid, but I giggled like him.

I made these letters years ago – they’re just mdf craft letters and I covered them in Halloween paper:

BOO letters

So easy, so simple, so cheap!!

These little spooky votives are still one of my favorite Halloween projects:

Halloween votive craft

You can see how I did them here. Again, less than $10 for all of them easy.

We have a bunch of creepy sparkly spiders (sparkly spiders are the scariest, of course) so I stuck them on the wall in the foyer:

spiders Halloween decor

Gotta admit, they freak me out. I added them to the leaves of our new fiddle leaf and I think I’m going to have to take them off. I can only handle so much.

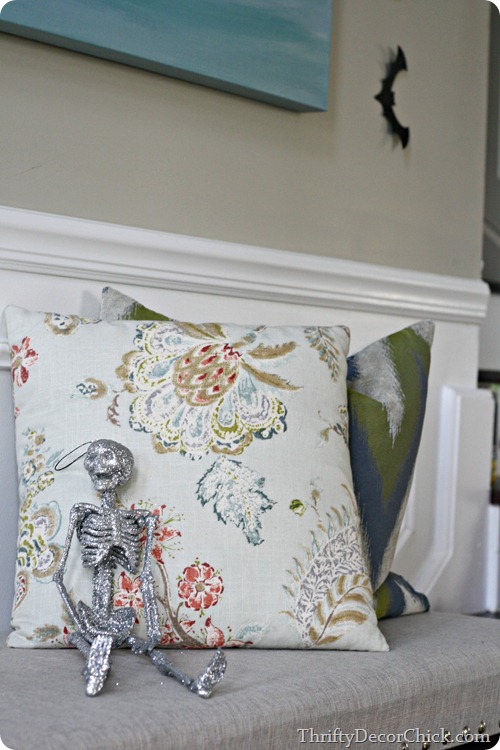
We have a lot of skeletons. I think they look pretty funny resting up against everyday stuff:

sparkly skeletons

Like, oh hello…just a skeleton hanging out. Chillin. This one finds something really funny or he’s terrified. I’m going with funny.

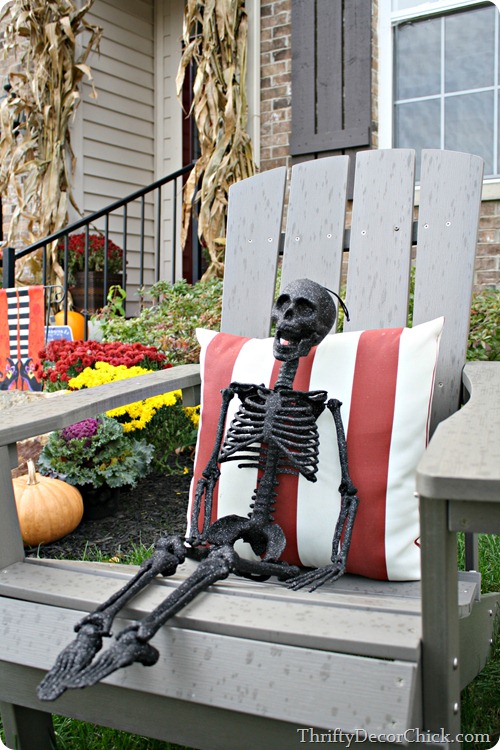
His friend outside is a funny guy too:

sparkly skeleton

I can’t remember where I got him but I know it was another clearance sale – I think maybe at Joann’s?

I especially love paper decor at this time of year. It’s inexpensive and hardly takes up any storage space – bonus! I picked up these creepy paper hands on clearance last year:

black interior door

They look smashing on the new black door. ;)

We use paper bats everywhere and I usually like to put them in one spot for more impact:

paper bats on wall

But the kiddo wanted to put them up all over so that’s what he did. I must admit it’s pretty cute to see them randomly flying around the house. There’s a few of them on the stairway, along with the infamous mice:

mice on stairs Halloween

After Mousegate I wasn’t sure I’d ever be able to put them up again, for real. But time heals all memories of mice in your house, right? They are pretty cute and they’ve become a tradition for us. :)

I’ve seen the idea of attaching googly eyes to photos and started it on the pictures on the stairs but our son HATED it. Like, hated. I stopped at two pictures – he’s right, it is pretty creepy looking. But pretty hilarious too.

Do you decorate your home for Halloween? How long do you have your decor up? I just love that my boy is still into it and wants to do it – it will be a sad day for me when he doesn’t.

You can see all of my easy and inexpensive Halloween decor through the years here. Have a GREAT weekend!

DIY stencil (fail and save!)

Monday, June 30, 2014 0 comments

Hello all! I hope your weekend was a great one! Ours was jam packed – we did a ton of family stuff, I got to hang with friends quite a bit and we went to a couple Fourth festivities as well. It was one of those weekends that is exhausting but leaves you feeling so incredibly blessed. I am a lucky lady.

So I didn’t have time to do much DIY this weekend but I did finish up a small project I started last week. This one started one way (a bit of a fail) and ended up another – I was determined to salvage it because I loved the look.

It all began when I found this platter at Target a few weeks back:

arrow platter

I think it was from the Nate Berkus line? I loved the arrow design in gold and knew I could recreate it for cheaper. It wasn’t too bad at $25 but my constant “Pushaw, I could TOTALLY do that for cheaper” usually wins out. And one day on a HomeGoods trip I found a large platter on clearance for $8 to try this myself – score!

Then I got started making my DIY stencil. I used my trusty FrogTape® to do it – I cut a piece long enough to span the whole platter, then laid the tape down on a cutting board:

using painter's tape to make a stencil

I just cut it freehand – this is not a time to be picky. There are times when I want something to look “perfect” but most times I like it to look a little more organic, so the different sizes and spacing didn’t bother me at all.

It only took me about 15 minutes to cut them all out – it was actually quite soothing. :) Sometimes I love a detailed project like this, it calms me.

After my “stencil” was done I laid it across the platter:

stencil from painter's tape

It was going to look so good!

And then I realized the paint I was using wasn’t going to work. It was way too thin and didn’t stick right at all – I was SO bummed. I mean, come on – it was going to look so similar to the other platter. And mine was even bigger! But…fail.

I was about to scrap the whole thing but I realized I could use the arrow design somewhere else to add a little somethin.’ Arrows are HUGE right now, right? I was at a jewelry party yesterday and bought an arrow ring. I see them so much lately.

Anyway, I have a little pen holder in my office that I thought would look cute with a little embellishment so I decided to try the stencil there:

DIY arrow stencil

My arrows were spaced out so I had to tear the long strip of tape up and make them work closer together.

I used gold Rub n Buff and it took no time at all to add a little bling:

gold arrow design

I only did every other panel because I didn’t want it to get too busy. I flipped the tape every other one so some go up, some down:

arrow stencil design

I love it! I have a few gold/brass accents in here so it ties in nicely. I didn’t realize till after I was done that it is the same look as my FrogTape trash can too:

farmhouse table as desk

So there you go – quick and easy and free. I was determined to put my little arrows to use somewhere and I think this is a sweet little spot. I have to say I must have pulled that tape off of the surfaces at least ten times and it still stuck at the end and didn’t tear apart even with the delicate design. I was quite impressed.

Have you incorporated the arrows in your home at all? Are they still trendy? Usually I get on the trends way after the fact but I’m thinking I’m still good on this one. ;)

Two ingredient scrubs

Thursday, May 29, 2014 0 comments

Well hello all! Are your kids almost done with school? We’re done tomorrow – whoot! I am SO grateful we didn’t have to go an extra week this summer with all the snow days we had this winter. Most of our school systems nearby added some time onto each day to avoid that.

Today I’m gathering some goodies for the teachers and bus driver as a thanks. I like to include something handmade if possible, along with what they really want (a gift card and a handwritten thank you). :)

I’ve seen so many great hand and foot scrub recipes over the years – some complicated and some incredibly easy. I’m going with the latter today.

These are all easy, quick scrubs that only take two ingredients each! I love the first one because it makes a great lip scrub as well. Cause you can eat it. :)

It just takes sugar and honey:

honey sugar scrub

I’m not going to give exact measurements here and I know that will stress some of you out – but I found you just mix till it’s the right consistency. You really can’t mess it up!

I just did a small batch for this one as a lip scrub:

honey sugar scrub

You’ll want to make sure it’s thick and pasty but not too dry. This is a great hand scrub as well! I know honey can get expensive though so I think this one is best for the lips.

My sister came over a couple weeks ago and whipped up this super easy scrub for Mother’s Day:

homemade coconut sugar scrub

Again, only two ingredients! I LOVE coconut oil and use it all the time when cooking, but it’s great for your skin as well. I added a few drops of lavender oil to it as well.

Coconut oil isn’t cheap either, so this next one is the cheapest version I’ve found and it works GREAT:

DIY hand foot scrub

Just mix sugar and dish soap. Done. Extra points if you have pink soap! :) I just used what I had so the slight color was a bonus. I used one cup of sugar and just poured and mixed the soap till it was the consistency I wanted. Test it out as you go to see if it’s just right.

SUPER simple and super cheap! I love this one because when you use it with water it foams up just a bit.

I found two glass containers in my stash and then used Target dollar spot goodies to label the scrub: two ingredient hand and foot scrub

I simply cannot walk away from the cute craft stuff in that aisle so it was nice to put the little stickers and stamps to use:

letter stamps

So there you go! Three easy scrubs with only two ingredients each!

I’ll combine these with gift cards and some other goodies for the teachers:

two ingredient hand and foot scrub

And at least this part of the gift was free! If you don’t have dish soap and sugar you’re looking at less than five bucks to make quite a few of these. This would have been perfect for my boy’s preschool days when we had six or seven teachers to buy for!

Do you do anything special for the teachers at the end of the year? Are you ready for summer?

Metal sheeting candleholders

Friday, December 20, 2013 0 comments

Say that title three times fast.

Did you just say it? Me too.

Oh yeah, it’s about that time! The kiddo will be out of school in a few short hours and after that it’s staying up late, sleeping in, eating cookies, watching movies and all kinds of general holiday debauchery. Cannot WAIT!

This is my last project working with True Value this year and it’s one I’ve been wanting to try for eons. Seriously, I’ve walked by these metal radiator grates for years and years and always wanted to do something with them. They’re just so pretty! There are so many designs to pick from too.

I picked up the cloverleaf design at my True Value for this project:

radiator grate candles

(For you locals I go to the Pendleton, IN location.)

I had two projects in mind and started with the easiest one. The other one will have to wait but I think it’s going to be awesome. :) This time I made some pretty candleholders with it and I think they turned out pretty cool!

You can see the design on the metal sheet better here:

radiator grate candles

This one is a pretty brass/gold color but there are other finishes available as well. Isn’t that cool?

I used tin snips to cut through it but scissors work too (it’s very thin):

radiator grate candles

It’s a good idea to wear some hand protection (even SpongeBob gloves would work) while cutting – the edges aren’t crazy sharp but you need to be careful with it.

By the way, I held my glass holders up to it to see what size to cut it first. Don’t forget that part. :) I used some extra Goodwill cylinders (just like I used for the Christmas mantel) – I told you I had a ton of these! They are ALWAYS at my local GW.

When it was cut out I rolled it up a bit so it would start taking the cylinder shape – you need to kind of help it along:

radiator metal candles

Then I wrapped it around the glass to see where the back met up. I took it off and then used a simple line of wire to secure the two together:

radiator metal candles I wrapped the wire at the bottom and the top of the metal to make sure it was going to stay put, and then just slid the metal “wrap” over the glass. That’s it!

I placed some simple votive holders with candles inside:

Radiator sheet candleholders

So pretty eh? I kept walking by them after I was done and oohing and ahhing to myself. They really are striking! I’m nuts over that metal design and the color. Of course you could spray paint the metal sheet any color you wanted too.

I think these look pretty for Christmas but they would work any time of year really:

Radiator grate candleholders

Couple of things – if you have little hands around you may want to add some ribbon around the top or bottom if you think kids will try to handle them. Like I said, the edges can be a bit sharp (it really depends on where you cut them).

Also, you really don’t need to have the glass candleholders! You could just as easily just roll them up, secure the back together and then place a votive holder inside – you can’t really tell there’s glass there when all is said and done.

And finally, this metal sheeting isn’t cheap – I think $20-something each? I’m not sure. But I got three good sized holders out of it and had plenty left over to make another, so it goes further than you think it will.

Have you tried any projects with this metal? I’m planning my next one already…I’ll let you know if it works out!

I’ll be taking most of the next week away to be with family – I’m sure I’ll be back before the holiday, but just in case I don’t “talk” to you before then – I hope you have a WONDERFUL holiday season. Stay safe and enjoy your family and friends!


I was one of the bloggers selected by True Value to work on the DIY Squad. I have been compensated for my time commitment to the program as well as writing about my experience. I have also been compensated for the materials needed for my DIY project. However, my opinions are entirely my own I would have done this project anyway and I have not been paid to publish positive comments.

Easy Christmas paper craft

Friday, December 13, 2013 0 comments

Guess what?! I’m a grandma. :) My stepdaughter had her precious, sweet, beautiful boy yesterday and we are over the moon for them. It was so emotional, more than I even thought it would be, to see him and touch him and know he is finally here. I only have a few pics since it was a crazy day but I want to wait to ask to her before I share any on the blog. (It didn’t seem appropriate to bring up my blog yesterday. Bigger things happening.) I’m sure I will (he’s too precious not to share) but it’s Mama’s decision to make.

I recently put together an ornament craft for my friend Kari’s blog but wanted to share it here too in case you didn’t see it. There seems to be a Christmas theme on the blog this week so I figured I’d just go with it. If you read this over at Kari’s you can just fast forward to see what I did with them all at the bottom. :)

This one is easy folks. There’s very little talent involved here, just good old gluing skills. The only part that takes time is the cutting, but I have a solution for that too.

So here’s the thing – I love using paper for holiday crafts. I do it at Halloween quite a bit (bats!) and I’m always thinking of ways to do more with it at Christmas. I love paper crafts for two reasons – you can get really creative with all the fun papers out there and they are SO easy to store since they barely take up any space. (You just want to be a little gentle with them.)

For these DIY ornaments I gathered some festive paper:

paper ornament craft

The red and cream are the textured cardstock – my favorite! Love that little extra detail.

To do this you’ll need “petals,” so I just free-handed one and then traced it to make a bunch more:

ucreate2

These do not have to be perfect! Is a flower petal ever perfect? Do they all match exactly? No. That’s why we love them. :) Once you get one petal you like you can just trace it over and over.

The trick to cutting out a bunch at a time is to layer your sheets of paper. So I would cut two or three strips out of one piece of paper and then lay the outlined part on top, then cut them out. Does that make sense? So instead of cutting out one each time I was cutting two or three. It helped a ton!:

paper ornament craft

Then you’ll want to do the same thing again, this time with slightly smaller petals. You won’t need nearly as many of these, probably half.

To start building your flower you’ll want to have something as a base you can glue on to. I just cut circles out of a paper plate, but anything will do:

paper poinsettia craft

Just make sure it’s not too big so that it shows behind the petals.

Then start making your flower! I used hot glue but regular glue would work fine. You just need a little dab on the back to make it work. I actually looked at photos of poinsettias to see how many “petals” I should use:

paper poinsettia craft

I put six larger ones on the bottom and then three on top. The middle is where I got creative:

paper poinsettia craft

I ended up using three jewels on them instead of one, to look more like a real poinsettia bloom.

I only used one piece of each color paper and got eight large flowers:

paper poinsettia craft

You can see here how I used a paper punch and scrapbook paper for the centers on some of them:

ucreate9

I kind of pulled the petals up on each one as well to give them some dimension – not a fold really, just a slight bend. I’ve folded the petals down the middle before to make them before and that makes them look even more authentic. But with this many it was going to take forever, so I went easy.

I added some little glittery jewels I found in the scrapbook area to the others:

paper poinsettia craft

Those are my favorites. I always say – I’m a non-scrapbooker who LOVES the scrapbook section. ;)

The best part? All of these were just a few bucks. The paper was less than a dollar (half off) for three sheets and the sparkly jewels were a few dollars with coupons.

OK, so my favorite thing about these is you can do whatever you want with them – to use them as ornaments just tuck them into the tree, no string needed! You could hot glue twine or ribbon to the back and turn them into a garland. Stick tape to the back and put them on windows, mirrors, whatever. Or make a bunch and create a paper wreath with them – the possibilities are really endless!

I ended up sticking them inside the Goodwill shadow box I first showed you here. I turned it on it’s side and it’s instant holiday art. :)

paper ornaments as art

I love these things – they are so versatile and they take up next to zero storage space! Major score.

I’m off to squeeze the baby some more right now and then I’m hosting our annual ornament exchange tonight with my girlfriends. This girlfriend needs to clean her house. :)

Hope you have a wonderful weekend, stay warm!

A quick and easy holiday project!

Tuesday, December 3, 2013 0 comments

OK, I feel SO behind this year with the Christmas decor! I mean we lose a week anyway, right? (Between Thanksgiving and Christmas?) And I usually have a decent start going before Thanksgiving. We got a couple trees up before our trip last week but not much else.

I’m determined to get it done this week – I’m just going to enjoy it and take my time. Have you started? Finished?

This is a fun little decor idea that I’ve shared before, but it has a Christmas twist and it’s SO easy I wanted to share it again.

In the past couple of years I’ve fallen in love with holiday-themed pillows this time of year. I just think they’re a festive addition, and all you do is toss. Toss, toss! (Name that musical.) Throw one or two on a sofa or chair and the room instantly feels Christmasy. Try it. It works.

Well the past couple of after Christmas sales I’ve picked up a few more placemats to make my favorite pillows EVER. Yes, placemats:

Placemats turned pillows

If you’ve been around for awhile, yes – I’m making more of these. Yes, I’m obsessed. It’s SO stinkin easy people. Even if you don’t sew I promise you can do it.

You need a placemat that’s double sided, so two pieces of fabric sewed together. A seam ripper makes easy work of making a hole in one side:

Placemat pillows

I usually open up about five or six inches, enough for me to comfortably get my hand inside to stuff it.

I use this poly-fil stuff:

DIY pillows

You just pull clumps out and stuff it in the placemat. I used to kind of fluff up the filler before I stuffed but I don’t anymore. It take less than five minutes to get it stuffed – just make sure you get some into the corners.

I like them pretty fluffy so I use about 3/4 of that poly-fil on one. Then just sew up your hole:

placemat pillow

Yes, I know – this involves a needle and thread. But I believe you can do this. :) It took me two minutes to whip that back together. It’s not perfect but I promise you no one will notice.

When you’re done you have a super cute, super cheap accent pillow for the holidays:

placemat turned pillow

I have this whole process down to ten minutes now. :)

My pillow form (aka placemat) was $2 on clearance after the holidays and my filler was $2 and some change (with a coupon). Less than $5 for a fun little splash of Christmas!:

Christmas pillow from placemat

I think the selection of placemats and napkins is way cuter than most pillows I’ve seen. You can see here how I’ve done this with Pottery Barn linens to make much cheaper versions of their pillows.

And last year I used one of their placemats to knock off one of my favorite holiday pillows from Pottery Barn too:

pottery barn pillow knock off

SO much cheaper!

There you go – I may have a bit of a problem (I shop the linens section more than the pillow section), but it’s so much cheaper! Whoot! Have you tried this little trick?

P.S. My friend Kari at Ucreate had me over at her place to share a Christmas ornament craft. See what I came up with here!

Reindeer games

Friday, November 22, 2013 0 comments

Hey folks! I’m going to keep this one quick because I have a cold and can’t focus on one thing too long. I looked for my keys for 30 minutes last night and looked for my phone for 20 minutes this morning. My brain is MUSH.

So earlier this week I took a break and went into TJMaxx for a bit. I found this lovely lady:

decorative reindeer

I put her on Instagram and mentioned I was going to glitter her up. I got some “Noooooo's” and some “heck yeah’s” and also a “I don’t think she’s a she,” which is true but it’s just to elegant to be a boy. So I’m saying girl. ;)

Anyway, I wasn't going to glitter all of her – just his her antlers. I used the bag to cover the rest of her up and then taped around the antlers:

Christmas reindeer

To make this as quick and easy as possible I used this Krylon spray paint to glitter them:

glitter spray paint 

OK -- I bought this a year or two ago and I don’t I’ve ever used it. These came out a couple years ago and I saw blogger after blogger had issues with this spray paint. I chose to believe that my can was different.

Well, it wasn’t. ;) It was a MESS. It sprayed great for a few seconds, then started sputtering and spraying all on it’s own. Then the glitter wouldn’t come out, just the coating stuff, and it was pretty much a disaster:

wow

That’s actually the good side – the color was horrible, it didn’t cover well and just looked like butt. Not the look I was going for. I think this paint would be good to give something a light, glittery sheen, but I wanted more for this project. 

Then it wasn’t drying so I ended up trying to wipe it all off and it was just a science fair. (That’s what we say when something is a disaster. This qualifies.)

So I was on to plan B -- the more time consuming plan. I grabbed my glitter glue and silver glitter and started doing it by hand. I got this glitter tray at Michael’s this past summer and it worked AWESOME:

glitter tray

You can lay items on it to dry and then when done just take that top part off and there’s a hole in the corner so all the excess glitter goes back in the container. It worked great, I just wish it was a little bigger!

So, after about 20 minutes of glittering she ended up with some major bling:

Christmas reindeer

I actually REALLY love how it turned out! She’s beeeeautiful! Yes, it was pretty to start, but I can never leave well enough alone, you know this.

The silver is SO pretty:

glittered antlers

Who knows if it will last till next year, but for now she looks lovely:

Christmas reindeer decorHave you tried that glitter spray paint? Did you have the same problems I did? Have you started decorating for Christmas? This is my first piece – more will come out this weekend. :) By the way – have a great one!!