Showing posts with label I am cooking?. Show all posts

As seen on TV

Thursday, March 6, 2014 0 comments

Hello my friends! It’s almost the weekend and I am happy to see it approaching! Anything fun planned?

So I always wonder about the “as seen on TV” stuff – you know, the slicers and dicers and curlers and magic doodads that fix everything? Back in the day I wanted to start a blog about just those products, but I figured that would get expensive fast. I don’t even buy many of them, but I love hearing how things work out for people.

And then the other day I thought…I have a blog – why not do it? (Occasionally.) So this is my first review, and I threw in a simple recipe to go with it. :)

I asked for this one for Christmas and my parents got it (and one for themselves!) cause it seemed like it worked and was easy to use:

 as seen on TV chopperchop magic

They ALL look like they work and are easy to use on the commercials though, that’s how they get ya!

It’s real name is Chop Magic and I decided to test it out on one of my favorite recipes – homemade salsa:

simple salsa recipe

My late father-in-law taught me how to make a great salsa and it’s so easy. I add two things that are a must (in my opinion) – cilantro and a bit of garlic.

You’ll need:

Tomatoes (I like roma)
Red onion
Garlic
Lime
Cilantro
Serrano pepper
Jalapeño pepper

Notice I didn’t say amounts – you just kind of add each one till it tastes the way you want it. I like a lot of cilantro and a little bit of pepper, but it will depend on how hot you can take it.

I do have to say quickly that my father-in-law (who was from Mexico) would be cursing me right now for using this tool, but I think he secretly would have liked it. ;)

So the pictures promise big things, like a whole (photoshopped) onion that appears to be easily chopped:

chop magic as seen on TV

I didn’t quite believe it but I decided to use the larger chop grate and tried one of the whole tomatoes, which would surely be easier to chop than a whole onion:

chop magic review

Uhhh, no. Do not try a whole vegetable. :)

DO slice it up (I did thick slices because I like mine chunky) and then do it:

chop magic review

That worked like a charm and I was on a roll. It really does slice the slices quite easily.

Because I like the onion chunks a bit smaller, I sliced those thin and then used the smaller chop grate:

as seen on TV chopper

So one small slice of red onion was really hard to get through there and I may or may not have put it on the floor and stepped on it to get it through. :) It’s the only way I could get it to cut.

I’m thinking a whole onion is NOT going to go through there, even with the larger grate. Just a guess. But the smaller stuff was great! I sliced the jalapeño and serrano and placed them on there as well to chop them even smaller and it worked great for those too.

After all the chopping was done I added a good amount of cilantro (just torn into pieces), juice from a half a lime and then some salt:

simple salsa recipe

DELISH. It is so chunky and fresh and so good. I went a little heavier on the peppers this time and wowza, it is hotter than usual. My father-in-law would be VERY proud of me for that one.

Here’s what I ended up using:

Five roma tomatoes
Half of a small red onion
One clove garlic
Juice from half of a lime
Cilantro to taste (I like a lot)
Less than half of serrano pepper
Less than half of jalapeño pepper (and it was hot!)
Salt to taste

You could use just a bit of one type of pepper if you don’t like it hot at all. Sometimes I just use some of a serrano and that’s it.

Overall I actually quite liked this little chopper – it worked really well for the most part. I made the process go much faster for sure and I liked that I could just mix everything in the container.

Do you have one of these choppers? It came with the Perfect Tortilla Bowl so that may have to be the next review. ;) 

Easiest, yummiest biscuits…ever

Thursday, November 14, 2013 0 comments

So Thanksgiving is only two weeks away! What in the world? And that means less than six weeks till Christmas. Ahhhhh! Are you freaking out yet?

Don’t freak out. Making these will make you feel better, I PROMISE.

I blogged about these little puffs of goodness years ago but didn’t really show them to you, so I’m dedicating a whole post to them because they are just. that. good. They would be a perfect addition to your Thanksgiving feast, and are so easy to make.

Most of us have a crutch when it comes to certain foods, right? Like sweets or chips or whatever. Mine is bread. Anything bread. Buttered, toasted…any shape, any color, flavor, I’m there. And dear Lord…the rolls at Texas Roadhouse? Forget about it.

These little biscuits are SO heavenly. They taste similar to the cheddar biscuits at Red Lobster. Is your mouth watering yet?

The best part is they are soooo simple. Three ingredients:

Easy biscuit recipe

One cup self-rising flour
1/2 cup butter (softened)
1 package (8 oz) softened cream cheese

That’s it! Now I added a couple extras this time to amp them up even more (they don’t need anything but I like to play around with tried and true recipes).

You just mix the three ingredients together. It will be very thick:

Easy biscuit recipe

One little addition I made this time was a bit of shredded cheddar cheese. Just a sprinkle, maybe a few tablespoons?

I scooped them out on the (greased) pan using my ice cream scoop:

Ice cream scooper for baking

I use this more for baking than I do for ice cream. ;)

When I had just a bit left to scoop out, I added some dill to the mixture:

Dill in biscuits

I LOVE dill and my sis suggested it – brilliant. I only added it to the last few cause I didn’t think hubby would like them with it.

This recipe makes over a dozen biscuits because I make them smaller. When you put them on the baking sheet you can place them pretty close together because they don’t spread much while baking.

Bake them in a preheated oven at 400 degrees for 15-17 minutes and then ENJOY their buttery, crumbly goodness:

Easy biscuit recipe with cheddar

Go ahead and eat one or three right off the baking sheet. I wouldn’t know anything about that.

They are seriously amazing. I make them when we entertain and they’re always a hit. LOVE.

If you’re planning your Thanksgiving meal they would be a great addition – let me know if you try them out! :)

What are you making for your Thanksgiving feast?

EASY crockpot applesauce

Friday, September 20, 2013 0 comments

What is up? Happy Friday to ya! So fall officially starts Sunday! It’s been “official” for me since the temps hit the 70’s around here, but whatev. Details.

Last weekend we went apple picking, it’s a long-standing tradition for us. Most of the apple varieties weren’t ready (I thought it was pretty early to go picking!), but that just means we’ll have to go back. Darn. We just picked mostly Jonathan’s that day and ended up with 15 pounds of apples. I always go a little overboard. :)

This year I wanted to try something I’ve always wanted to make. Of course I thought it would be a long laborious process involving smashing 25 apples by hand or something like that, but I was OH so wrong.

When I mentioned that I was going to make applesauce earlier this week, my friend Cristina mentioned she was making some. I asked for her recipe and she was all, oh I just throw the apples in a pot with some cinnamon and it’s totally easy and MIND BLOWN.

I had no idea! So I did a little research and found she was totally right. (Not that I didn’t believe her of course.) Here’s the recipe I used and of course I used my crockpot – I threw it all in and came home to applesauce. You can’t beat that.

You only need three ingredients – ten to 12 apples (I grabbed 12 because some of mine were small, but ended up using 11), sugar and cinnamon:

crockpot applesauce

The first step is the only one that takes time – you need to peel, core and cut up the apples. Thankfully I’ve had an apple peeler/corer/slicer for years:

apple peeler slicer corer

I honestly think I’ve had this for about 12 years and I rarely use it. (It’s called Peelota. Har.) But it’s one of those things you don’t get rid of because when you need it, you really need it. This is one of those times.

This doodad ROCKS:

apple slicer corer

It made quick work of getting them all ready to go. They looked like this when I was done:

easy crockpot applesauce

I just cut the apples in half from the top. If you don’t have one of these you’ll want to slice them up or just cut them into chunks.

I dumped them all in the crockpot and then added 1/2 cup of sugar and didn’t even measure the cinnamon, I just sprinkled (a lot):

simple crockpot applesauce

I added a dash of nutmeg too – because I’m wild and crazy like that.

I didn’t even stir – just left it as it was, put the lid on and set it to cook on high for four hours. We left the house for the evening, came home and could smell it…wow!

I stirred it up a bit and was freaking (in a good way), because it looked SO GOOD:

easy applesauce recipe

Here’s the thing – I’ve never heated up applesauce at home. Have you? Uhh…it’s amazing!

It was incredibly yummy. Like a dessert really – I like it chunky (name that movie) so I left it as is. Hubby and I both stood over our bowls in the kitchen and stuffed our faces with it. And then did it again later, and I’m doing it again right. now.

SO GOOD, so stupid easy:

Simple crockpot applesauce @ thriftydecorchick.com

And not too horrible for you either!

This batch is almost gone already but I’ll be making more for sure and want to can it when I do. What a lovely little gift for the holidays, right?

Next time I’m going to try it with just a 1/4 cup of sugar though – I really don’t think it needs half a cup. I’ll let you know how it turns out.

Here’s the recipe for you again:

10-12 apples -- peeled, sliced, cored
1/2 cup sugar (less would be fine)
sprinkle cinnamon on top – at least a teaspoon
dash of nutmeg (not needed)

There you go – have I blown your mind? Or all you all, duh Sarah…it’s totally easy. I really had no idea. Now go get some apples and cook it up! You will thank me. :) Have a GREAT weekend!

Best sangria recipe

Friday, June 28, 2013 0 comments

Welcome to Friday, whoot! Hope your week was great and you have an even better weekend planned!

First up, I’m over at SAS Interiors today sharing how I strive to create a meaningful home:

CreatingaMeaningfulHome_BlogButton

It’s a great series with some fabulous bloggers contributing – check it out! Thanks for having me Jenna!

So today I’m sharing one of my very favorite recipes…of the liquid kind. :) I figured I’d post it today so maybe you can make it yourselves and toast to the weekend, yes?

Aw yeah.

So a lovely reader shared this sangria with me years ago – I needed a good one for an event coming up and sent out the call on Twitter. I’ve tried a lot of sangria in my day (well not a LOT, but a few…you know. Whatever.) and it’s hard to find one that has the right amount of sweet and fruitiness.

Here’s the thing – the initial cost of the ingredients is a little expensive. The liquor needed is about 20 bucks and then you’ll need to buy a few things to make it each time (most of which we already have). But the expensive stuff will last you a really really long time – so over time it’s not too crazy bad.

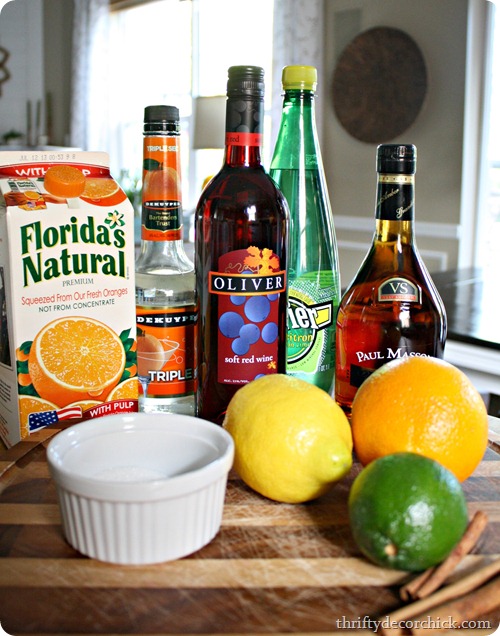
Here’s what you’ll need:

classic sangria recipe

1 1/2 cup orange juice
2 tbsp triple sec
1/2 cup brandy
1 bottle (750 ml) fruity red wine (the cheaper, the sweeter, the better) :)
3 tbsp sugar
2-3 cinnamon sticks
lemon/orange/lime or even strawberry, pineapple, whatever!
1 1/2 cup chilled lemon/lime sparkling water

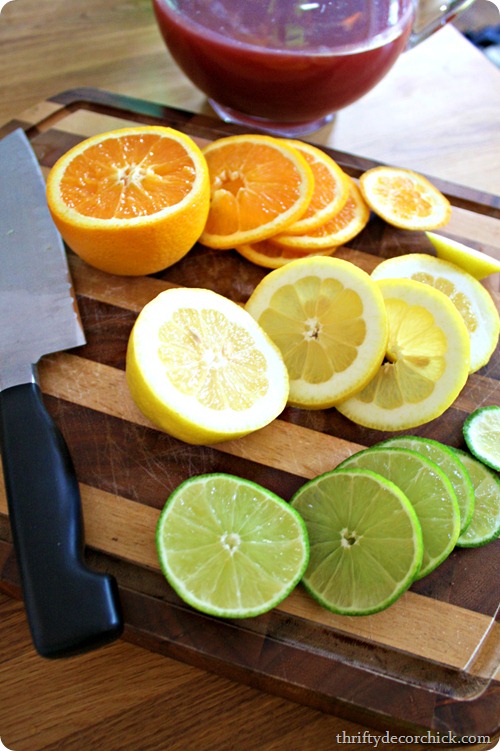
You’ll want to mix the first six ingredients (hold off on the lemon/lime water) and stir. Next up, cut the fruit into slices:

classic sangria recipe

One of the reasons I love this drink is because it’s such a pretty one to serve. :)

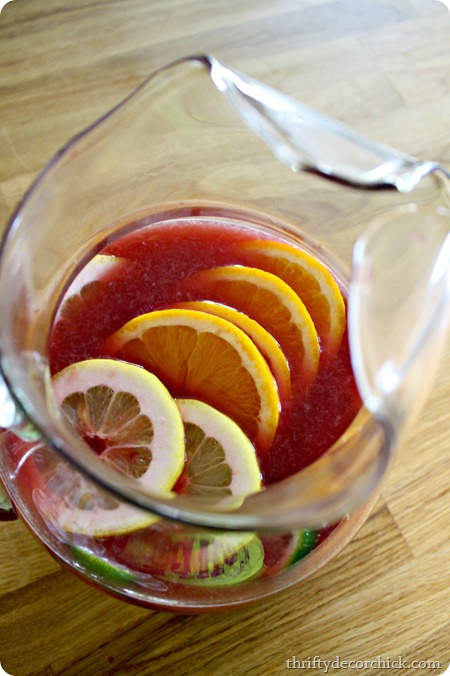
Just make sure to clean the fruit well before slicing since you will be adding it to the drink:

classic sangria recipe

Side note – we like our orange juice with pulp. Usually I make this with OJ without it (it’s clearer) but I was using what we had this time.

This is where I like to let it steep in the fridge for a while – preferably over night. But it is still super delicious right away too. My sister-in-law had some right after I mixed it last night and it was yummy, but letting it sit really deepens the flavor.

Right before you serve it (after letting it steep for awhile or right after mixing everything), add the lemon lime sparkling water – this is what gives it a slight fizz. So good!

I make this for every party or girl’s night and it’s always a hit. My SIL and I were reminiscing tonight how my father-in-law loved sangria and would always order it when we went out to new restaurants. Thing is he would always turn up his nose after trying it and it made us laugh every time – he could never find one that was just right.

But I’m proud to say he LOVED my sangria. ;)

Hope you’ll try it and love it too!: best sangria recipe

Have a great weekend, cheers!   

**Go here to see all of my easy recipes!

Pineapple angel food cake

Friday, May 3, 2013 0 comments

OK peeps, I don’t share recipes around here often but when I do you know it’s going to be either really easy or really good or really easy and good. This is both, score!!

I don’t have a source for this, (a friend reposted it on Facebook) so if you’ve seen it somewhere let me know. I don’t even know what to call it? Pineapple angel food cake? Pineangel food cake? Pineapple fluffy goodness?

I don’t know. It’s yummy though, and stupid easy. You just take a box of angel food cake and a 20 ounce can of pineapple:

easy pineapple dessert @ thriftydecorchick.com

I’m sure you could use fresh pineapple (just keep the juices!) but wow…this is supposed to be easy remember? ;)

You just dump the pineapple in with the cake mix:

pineapple angel food cake dessert

And that’s the only ingredients! When I first saw this I thought, wow, that’s crazy easy! And then I remembered you only need water with the angel food cake mix anyway, but I digress…it’s still easy.

The pineapple juice will react with the mix and make it super frothy and fluffy – it was fun to watch:

easy pineapple cake dessert

The more you mix it the bigger it will get!

Then you just pour it into a pan and bake for 30 minutes at 350 degrees. That’s it! (I ended up using a 9 by 13 pan.)

I starting mauwing on it right out of the pan when it was done and it was SO GOOD warm. Wow. YUMMO.

But I soon realized I could make a little parfait:

angel food cake and pineapple easy dessert

I just layered the pineapple goodness and whipped topping and it was SO. good. The cake was just fine at room temp but like I said, I loved it heated up a little.

So there you go – a super easy, really yummy dessert. Perfect for this time of year with the pineapple and great for when you have people coming by and need something fast:

angel food cake and pineapple, easy dessert @ thriftydecorchick.com

Or when you’re home alone in the middle of the day. Whatever.

;)

I’m off to get more ingredients today so I can make it again this weekend. Have you tried this easy dessert? Any other simple sweet recipes you’ve tried? (Some readers on Facebook said they have tried it with cherry filling too – doing that next!)

**Check out my other easy recipes here!